Tuesday, January 19, 2016

Miss Kate Cuttables "Hello"


This adorable phone file is a Miss Kate Cuttables. I made the file larger to make it into a card.


Let's make the card!

First open the phone file up in your favorite cutting program. I used my Silhouette program and cut it with my Cameo. I sized it to 4 1/2 inches (If you want it to fit an A2 envelope, size the card to 4 1/4). I made a copy of the base card, flipped it, overlapped it a tiny bit on the original phone base and then welded it together. This is how you make a card base for any of your die cuts in a cutting program. (If you are confused, I will have a post coming soon with step by step photos on how to make a card from a die cut.)

Next cut out all your phone pieces in the color cardstock you would like. (You don't have to pick the same colors as I did. Be creative! Use scrap paper you may have for the smaller pieces.) Ink all your pieces with coordinating inks. I used Dew Drop inks to ink my papers. To add some interest use textured papers for the phone base or run the papers though an embossing folder.


Assemble your phone pieces and add them to your phone card base. My card base was white, so my phone cord was white. If you desire a different color phone cord, use colored paper for your card base. For added dimension I popped up my heart on the dial with foam adhesive. I even added some bling to it with some Wink of Stella.


I cut out the "hello" sentiment (also used Wink of Stella) and attached it to the inside of my card.


At this point you are DONE! You can use an A7 envelope or make a special one with an envelope maker.

Sledding Fun!


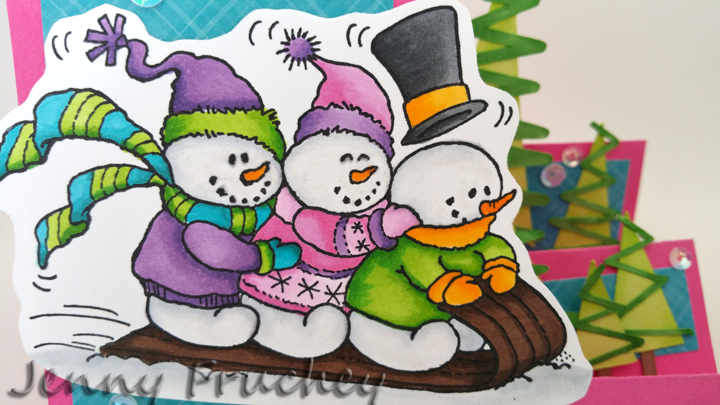
This colorful card will brighten up anyone's day! I have a sentiment for Christmas but you can add "Let It Snow" to the bottom for a fun, winter "pick me up" card!

I stamped the playful snowman image from Stampendous Impressions on Copic friendly paper.  (Not sure of the name but the code was CRP234. If you can't find this exact stamp set, use another snowman image.)  My paper was Neenah solar white cardstock and I used Memento Tuxedo Black ink which is also Copic friendly. Stamp your image and color it. Cut the design out leaving a small border around the image.


For the card base there are several options. I used a Sizzix die for my base and background papers. You can also use a Silhouette cut file from Lori Whitlock. Both options will give you the same result. Cut out a base in desired color using cardstock. Then cut liner papers that coordinate with your base paper. I used pink cardstock and a bright blue for my base papers. Scrap paper works great for these pieces! Attach papers to base after they are cut out and add your main image to front of card as shown.


To add interest to the side, I cut out some triangle scribble trees in various sizes from the Silhouette Design Store. They vary in size from 1 inch to 3.5 inches tall. (Including stumps)
Add the trees to the side steps in a staggering fashion. I used some dimensional foam squares to pop up some of the trees to add some extra dimension.


Cut a sentiment out of cardstock using your die cutting machine and your favorite font or use a die. I used "Merry Christmas" die from Lawn Fawn. Like I said above, if you want to use this as a winter card you can use "Let It Snow" from Lawn Fawn or any other sentiment you would like. You could even stamp one! This would make a great birthday card also by using "Happy Birthday" by Lawn Fawn. I love Lawn Fawns dies! (as if you couldn't tell....)

You could be done at this point or go the extra mile, like I did, and add some sequins!

STAY WARM MY FRIENDS!!

Art Impressions Snowman Shaker


This cute Snowman Shaker card design is from Art Impressions. The packages and his arms are separate and they "wiggle". They are mounted on an Action Wobble. It is fun watching people's reactions when they receive these cards. They are so interactive and fun!

Let's make the card!

Stamp your snowman image and the arms with packages on some card stock. I used my Copics to color the image so I used Neenah solar white cardstock and Memento Tuxedo Black ink to stamp the image. Memento is Copic friendly as well as the Neenah paper. If you plan on using colored pencils or other color mediums use the correct paper for your medium. Color your image.


Cut out the snowman and the spare arms and set aside for now. Use a paper punch or die and cut out a snowflake. I used my Silhouette Cameo to cut out a 2 inch snowflake and paper punch for the 3/4 inch circle. I stamped "be merry" from a stamp set and inked the edges with light blue ink. To add some extra sparkle I used some Wink of Stella on the snowflake. Use a dimensional foam square to attach the circle to the snowflake.

The card base is one I use over and over. It is the Sizzix Framelits Kind Sentiments Step Up Card set. Not only does it have the base die but they also have dies for the side and base papers already sized to fit exactly on your project. No more measuring for that perfect quarter inch border! I love the fact that I can use scrap papers for these cards because I can position the die over my scrap and make sure there is enough paper before I cut. Let's face it, we all love to use up our scraps so we don't have to bust into a whole piece of paper from our stashes! (Yes, I am a paper hoarder!)

Pick your papers and cut out a base with cardstock. You can use decorative papers for the side and base layers. There are even fun dies included in the Framelits set that will do some fancy cutting to the side panels, no paper required. I choose some polka dot papers I had left over from a previous project and some blue scrap that I used for the background of the main image.


Attach your snowman to the base. Attach your wobble to the back of the arms and then adhere to snowman. If you attach the wobble to the base first you may see it peeking out from behind the arms. (It is best to attach to the back of the arms so you can position it where it won't show.)

Now it is time to attach the snowflake to the bottom left of the snowman. At this point you can be done but to add a little more interest I added some button snowflakes I had in my stash. If you don't have any buttons shaped like snowflakes you could add some snowflake punches or some sequins.


Feel Better Soon!!


I'm here with a very quick and easy card to make for someone under the weather. These cold winter days, I 'm sure you know someone who has a cold and could use a reminder you are thinking of them. This card is so easy, you may as well make a few to keep on hand! 
 

Let's make the card!

Cut card stock to make an A2 size card blank. A2 is your standard card that measures 4.25 x 5.5 inches when folded. ( Take a full sheet of 8.5 x 11 inch sheet of cardstock and cut in half across the middle. Score each 5.5 x 8.5 down the center of the card. Now you have two A2 card blanks. They can be used as standard side opening cards if the fold is at the left or turn the fold to the top and you have a top folding card.) This is a side folding card so your fold should be to the left side.

Take a piece of 1.5 x 8.5 inch paper for the left side of the card. I used some polka dot scrap paper I had in my scrap drawer. Attach to card front blank. Next take a piece of scrap white paper measuring 2.75 x 8.5 and add some holes by using a push pin or needle tool. This is optional but it added some texture and looked great with my theme of dots!

Stamp a band aid on some scrap white card stock (or on pink decorative paper and skip the coloring) with black ink. Color the band aid pink and in my case, color the heart red. I used a stamp set from Paper Smooches called Healthy Vibes. (For added dimension add some glossy accents by Ranger to the heart when you are done making card. It needs time to dry.)

Cut out band aid and use dimensional dots to adhere and pop up the image. Stamp your sentiment above the band aid with black ink. Tape finished panel to the right side of the card and round the corners. I used a Crop-A-Dile Corner Chomper by We Are Memory Keepers.

Make a pile of these using your scrap papers to reduce your scrap pile and make someone whose feeling under the weather, smile!

Monday, January 11, 2016

CHEERS!

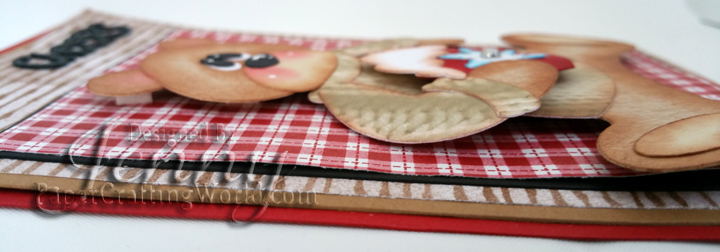
Today's sweet bear is a cut file from Paper Crafting World, Bear Holding Hot Chocolate. He is a very easy file to cut out and assemble. It is a great card for a winter birthday or just a wintery hello!

 
 Let's make the card!

1. Open the file and adjust the bear to measure 4.25 inches. My card is 4.5 x 6.5. It fits into an A7 envelope without any extra shipping.
2. Cut the bear pieces out in desired colors.
3. Shade each cut piece with ink. I used Memento Dew Drops.


4. Assemble the bear. I used dimensional glue dots on the cup. Add some dots of white paint to check and eyes for high lights. I also added a rhinestone to the snowflake for some added bling.


5. For the papers: Red base is 4 1/2 x 6 1/2; Brown 4 1/4 x 6 1/4; Decorative Brown Stripe 4 x 6;
 Black 3 5/16 th x 4 13/16 th; Decorative Red Plaid 4 1/4 x 6 1/4.
6. Layer all the papers and adhere with tape and use dimensional pads to pop the bear up off the mat.
7. For the word, "cheers" I use the Sizzix Thinklits Drop-Ins.  I cut off the word HOLIDAY and just used CHEERS. Attach it to the top right of your card.
8. You can use anything to decorate your card front. I used some faux enamel dots I made from melting some Perler beads.


Monday, December 21, 2015

Paper Crafting World's Elf on a Shelf

My elf came off the shelf and is just popping in to say, Merry Christmas! I used the Paper Crafting World's Elf on the Shelf Boy Cut File, for this easy Christmas card. I know it is almost Christmas but this is easy enough to make in a rush.


I cut him out, inked the edges with Dew Drops ink pads and assembled him. I cut a circle with a sizzix scallop circle die and layered that over red dot scrapbook paper. I added that over a plaid piece of scrapbook paper and adhered it to a red A2 card.


To finish the card off, add embellishments you have in your stash. I had some red faux enamel dots I used as berries (I also used a yellow dot for a button) and hand cut some green paper for some holly leaves. I added them in the corners and a baby bow under the banner. The baby bow is from Paper Smooches. If you don't have a bow die, use ribbon to tie a bow and glue on with glue dots, add a banner stamped with your favorite holiday greeting and you are done! (You can use a die to cut the banner, a cut file of a banner or free hand one.)


I hope you enjoyed this easy Christmas card. I want to wish you all a Merry Christmas and hope you check back in the new year for more fun and easy projects!

Monday, December 7, 2015

Do you want to build a snowman??


Let's make a pop up card!!


This adorable little girl and her snowman friend are files from Paper Crafting World's
Frosty Fashionista.


Take an 8.5 x 11 inch piece of blue paper. Cut it to 4.25 x 11 inch. Score 5.5 inches down to make a vertical top fold card. With the right side of the paper we will make the base.  Cut the base to Score (a) .38 inch from the bottom
and (b) .38 up from that score. Then turn the paper over and score (c)
at .38 from other side.


(I did a sample of what it should look like. This should be done with your blue paper not orange. I used this as an example.)

Next fold on the score lines. A a valley fold, B mountain fold and C mountain fold. See below for folds and placement.


Now cut out the little girl and snowman from frosty fashionista. (Do not cut any images larger then 3.75 inches tall so they don't peek out of the card when it is closed.) Cut out some clouds and a sun either with a die, free hand or use this adorable set called, Apple-Tree-Clouds-Sun-Grass.  Ink all the edges with coordinating Distress Inks. Free hand some snow banks and ink them with a light blue ink. Add clouds and sun to the background of the card. Add some snowbanks. Decide where you would like the little girl to stand and where you would like the snowman to be. (Check before you cut anything that the images are placed far enough back so they don't stick out when the card is closed.) Then cut a slit in the floating floor with an X-ACTO knife.  Cut a strip of paper for a support and fold it at the end to secure to the bottom of the card through the hole you created.  Adhere the girl to the support. Do the same for the snowman. Add snowbanks to the front or back of their feet so they will move with the card. For added support, make another strip and fold on each end and adhere to background and back of girl and snowman's heads. Fold the card and train all your folds to lay flat. For some added bling I cut some snowflakes out of some glitter wrapping paper and glued to the bottom of my floating floor.


For the front of the card: You can decorate any way you would like. I added some decorative paper to the bottom of the card. Used some green paper to make a strip of paper to go above the patterned paper and die cut some words on my die cutting machine. I used glittered wrapping paper for all the shiny stuff, even for the faux ribbon across the card. Lastly I rounded the bottom corners of the card with my corner chomper.


If you would like to turn it into a Christmas card, add a Christmas tree to the background with some presents or have the little girl holding a gift.