Showing posts with label let it snow. Show all posts

Friday, November 2, 2018

Snowy Greetings from Joy Clair Stamps

"It's the Season" over at Joy Clair Stamps!! Join us for a fun Hop with all the Designers using our holiday stamps for lots of great ideas for the Holidays!

I love the "Snowy Greetings" stamp set from Joy Clair Stamps. It has a lot of fun sayings and cute images to boot!


To make this card I started out with some blue card stock and splattered it with some watered down acrylic paint. I loaded an old tooth brush and ran my thumb down the bristles to make a tiny spray of "snow".


 Next, I stamped some of the snowflakes from the set with some Versamark and used some white embossing powder to set them off. I heated it with my heat gun and moved on to my next step.


I stamped the snowmen on copic friendly paper with some Memento black ink and colored them in with my copics. I used a tiny bit of sparkly pen when I was finished because I love the shimmer it adds to snow.


I added my snowmen with some adhesive foam dots and stamped, "Let It Snow" with the same black ink and added some ... with a black pen. As usual, I didn't stop there with my "black pen" so I added some outlines around my blue card stock to add some more detail.


I mounted my blue paper onto an A2 card base with foam adhesive and I was finished! Check out the whole release HERE!!

Thank you for joining me today. Don't forget to sign up for my newsletter!!


Sunday, April 16, 2017

Paper Piecing Fun

This cute little guy is a stamp from Penny Black named "Snowy". There are so many ways to decorate this guy, I am having fun doing some of them. This one is paper pieced. You can color with markers, watercolor with paints, or color with colored pencils. What ever the medium you like to work in, this little guy is fun to do!

I used Doodle Bug paper for the background, scarf and hat paper piecing as well as the gingham paper strip. I did some simple coloring on the body, face and hat with Spectrum Noir alcohol markers from Crafter's Companion. (The markers will be available on HSN Tuesday, May 9, 2017 with a whole bunch of other goodies from Crafter's Companion! Mark your calendars! It will be 24 hours of crafts and crafting items. Be sure to check out the "Today's Special" of wonderful card making dies from Crafter's Companion.)  I also used a Lawn Fawn stitched rectangle for the main image which I popped up on foam adhesive. I added the faux enamel dots, which I made, for my embellishment. For the sentiment I used a Lawn Fawn set called Winter Scripty Sayings.

I hope this gives you some inspiration (if not, you can check out this Pinterest page for more ideas) to get some card making of your own done. (It is never too early to start those Christmas cards!) Be sure to follow to my Pinterest page while you are there! Also subscribe to my blog on the right hand side of  this post to receive updates of my blog in your email!

Thank you and Happy Crafting!


Tuesday, January 19, 2016

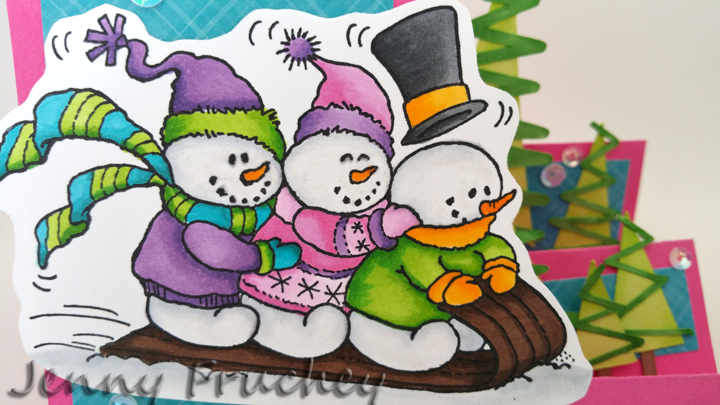
Sledding Fun!


This colorful card will brighten up anyone's day! I have a sentiment for Christmas but you can add "Let It Snow" to the bottom for a fun, winter "pick me up" card!

I stamped the playful snowman image from Stampendous Impressions on Copic friendly paper.  (Not sure of the name but the code was CRP234. If you can't find this exact stamp set, use another snowman image.)  My paper was Neenah solar white cardstock and I used Memento Tuxedo Black ink which is also Copic friendly. Stamp your image and color it. Cut the design out leaving a small border around the image.


For the card base there are several options. I used a Sizzix die for my base and background papers. You can also use a Silhouette cut file from Lori Whitlock. Both options will give you the same result. Cut out a base in desired color using cardstock. Then cut liner papers that coordinate with your base paper. I used pink cardstock and a bright blue for my base papers. Scrap paper works great for these pieces! Attach papers to base after they are cut out and add your main image to front of card as shown.


To add interest to the side, I cut out some triangle scribble trees in various sizes from the Silhouette Design Store. They vary in size from 1 inch to 3.5 inches tall. (Including stumps)
Add the trees to the side steps in a staggering fashion. I used some dimensional foam squares to pop up some of the trees to add some extra dimension.


Cut a sentiment out of cardstock using your die cutting machine and your favorite font or use a die. I used "Merry Christmas" die from Lawn Fawn. Like I said above, if you want to use this as a winter card you can use "Let It Snow" from Lawn Fawn or any other sentiment you would like. You could even stamp one! This would make a great birthday card also by using "Happy Birthday" by Lawn Fawn. I love Lawn Fawns dies! (as if you couldn't tell....)

You could be done at this point or go the extra mile, like I did, and add some sequins!

STAY WARM MY FRIENDS!!