Showing posts with label Jen's Crafty Place. Show all posts

Thursday, May 23, 2019

Bookmarks with Recycled Paper and Miss Kate Cuttables

Miss Kate Cuttables has done it again!! Another great paper pack out with Spring in mind!! I love these packs.


If you are going by Miss Kate Cuttables website to check out all the new items don't forget to pick up a Freebie!!


I am an avid reader. I love PAPER BACK BOOKS. I do the digital thing once in a while but I love paper!! So, I am always in need of bookmarks. I hate to bend my paper pages into "dog ears" to make my pages so I turn to my bookmarks. I have many books going at once. I like to leave them in places to make it convenient to read. I have one next to my bed, upstairs, one in my craft room, one in my family room and yes, one in the bathroom!!


I was thinking of what to make my next batch of markers with and there it was!! The new Miss Kate Cuttables Spring pack with the front page SCREAMING BOOK MARKS!!  So I took up the challenge.

Just take the display page you usually discard and cut along all the lines. It is that easy!! I then matched up my favorite papers together and taped them back to back.


Then I ran them though my laminating machine. If you don't have a laminating machine you can use contact paper and sandwich them between the contact paper and trim out.


When I was finished trimming them I used a hole punch to punch holes at the top and then strung ribbon through them. (You can also use the fancy tousle things but I only had one.) I also used a corner rounder on the edges so they don't poke me. The plastic is sharp when you leave the corners at 90 degree angles.


This is a great way to save your fun Miss Kate Paper for other projects but still get a large assortment of bookmarks for your reading place holders!! Enjoy!!

Thanks for joining me! Please take some time to check out some of my other posts with more inspirational ideas and join my newsletter so you will get all the new posts sent directly to your email!!

Happy Crafting!


Thursday, April 18, 2019

Easter Wreath with Miss Kate Cuttables

Hi!! I am going to show you how to make a fun Easter decoration on your die cutting machine using Miss Kate Cuttables Easter Wreath SVG.

Before we get into the project, go over to Miss Kate Cuttables to pick up your "Daily Freebie". This Easter wreath was a daily freebie and is now a discounted file.


I cut out my design using the "Easter Wreath" svg making it as large as I could using my Silhouette Studio. I cut out each layer using the coordinating color. The file you will receive from MKC will have a color coded image either all together or with all the pieces of the project apart. I usually use the one together so I know how the pieces go when I go to put it back together.

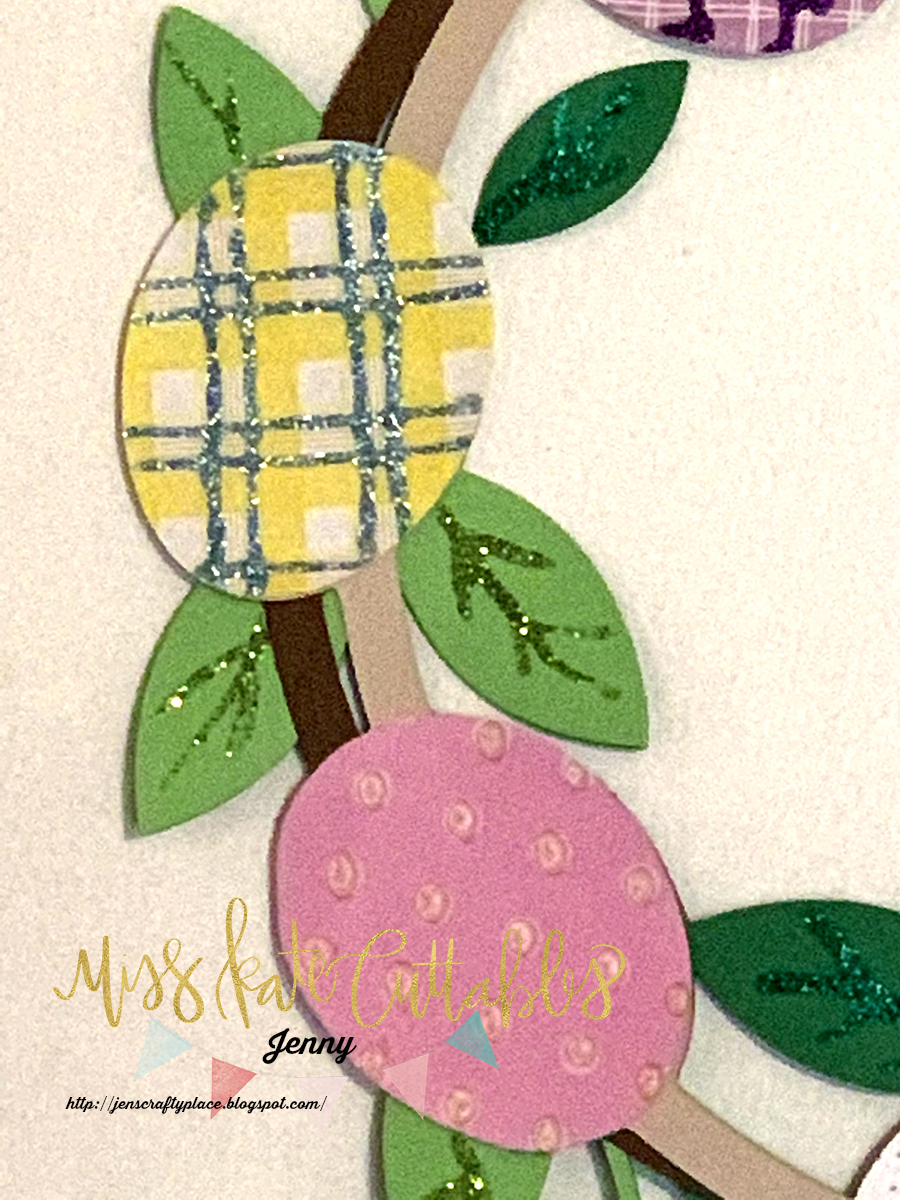
After I cut out all my pieces I glued them together. (I used the Miss Kate Cuttables Mat and Blades.) You can be done at this point!! It is easy to make beautiful items by simply cutting and assembling. But, with this project I went a step further and decorated all my Easter eggs and the leaves of my wreath with GLITTER and BLING!! You can use solid papers to decorate the eggs or pattered paper and leave them as they are cut. I used my patterned paper and many glitter glues and rhinestones to jazz up my wreath.


I like to get my fingers dirty sometimes!! This is also a great project to do with children. Let them decorate the eggs and then glue them to the wreath for a special memorial wreath. Let each child write their name on an egg, or have them put what they are thankful for. There are many ways to use this wall hanging. Use your imagination and have fun creating!! Don't forget to post pics in the comments below to show off your designs!!


Thanks for joining me! Please take some time to check out some of my other posts with more inspirational ideas and join my newsletter so you will get all the new posts sent directly to your email!!

Happy Crafting!

Wednesday, April 10, 2019

New Paper Packs from Miss Kate Cuttables


Spring has sprung at Miss Kate Cuttables. The flowers are in bloom and the day are longer. Bunnies, baskets, chicks and eggs are all signs that Easter is upon us! Over at Miss Kate Cuttables we have a new Easter line of paper packs and die cuts. These newly designed Easter papers and die cut packs includes all things Easter. Featuring baskets, flowers, sweet little chicks and bunnies all in bright, airy colors!

Miss Kate Cuttables has a new release!! Paper packs that have coordinating die packs too!! Check it out HERE and AMAZON!!  I used the Easter Fun Pack to make this EASY card for Easter.


https://www.misskatecuttables.com/products/product/easter-fun-paper-pack.php

https://www.amazon.com/Paper-Die-Cuts-Cardstock-Scrapbook/dp/B07PGBTNWL/ref=sr_1_fkmrnull_1?keywords=Miss+Kate+Cuttables+easter+die+cut&qid=1553710734&s=gateway&sr=8-1-fkmrnull


You can also find the digital versions of each pack HERE! 
 
Before we get into the directions don't forget to pick up today's FREEBIE over at Miss Kate Cuttables!! 


I used a die for my card but you can cut the same card using THESE directions. I used some matching cardstock to make my base and then used the decorative paper from my paper pack to decorate my card. The fun part is using the paper dies provided to decorate my card!! So much to chose from. I used some dimensional foam pads to pop up some of my decorative elements too!!


That's it! I hope you like the card and stay tuned for more fun projects from this Easter Paper Pack!

Don't forget to drop by my blog for more ideas and sign up for my newsletter to get the latest posts as they are posted!


Today I have a special treat, I have a bonus project for you!! This is a swing card using the same Eater Paper Pack!!


I used the same paper pack as I stated above from Miss Kate Cuttables but changed out the card base for a swing card. I love to make cards using paper packs because they are fast, easy and most of all beautiful!! You can find the card directions HERE. 


I love this card and best of all, I can use it for a birthday, thinking of you, just because or any occasion since flowers are pretty universal.  I still have tons more paper and die cuts to make more!!


Don't forget to drop by my blog for more ideas and sign up for my newsletter to get the latest posts as they are posted!

Pinterest

Miss Kate Cuttables has generously offered each design team member a pack of the Easter Fun Paper Collection and matching Easter Fun Die Cuts to give away on their blogs. All you need to do to enter is:

1) Follow the Miss Kate Cuttables blog and comment on this post.

2) Follow and comment on each design team member's blog.

Check out our design team inspiration by clicking on their names to go to their individual blogs!

Monday, April 8, 2019

Miss Kate Cuttables April Challenge: Bunny

Over at Miss Kate Cuttables they have a monthly challenge and this month challenge is: Bunny/Bunnies. Just use a Miss Kate Cuttables file with a bunny, make a project and post it on our site to win. Also check out the "Daily Freebie" while you are there!!


 This simple card is an inside spinner card. It can be made with any file but I chose this cute bunny from Miss Kate Cuttables! This file is called, "Stuffed Bunny". Below is a video on what a spinner card looks like when you open it. Check it out, I will wait..........


........Fun, right?? You can put any design in the center to customize your card to different occasions.
 I cut a A2 card or a piece of natural card cut 5.5 x 8.5 inch, scored at 4.25inch.  The inside piece of paper which is cut from white card stock to 5.25 x 8.5 and then you can score it at 4.25 and 2.5 inches from each sides for the side panels. Die cut any any shape for your opening. Either a circle, square or oval like I did. I used a scallop but you can just use a regular oval too!

Then take your spinner element, mine being the bunny, cut two images that are the same from the front and the mirror image. I used print and cut option and printed out two of the bunnies and gave him a hair cut, since that would not line up with my mirror image, and added some clear thread between them. This is the spinning mechanism, you just tape the strings to the back of your opening and attach the white paper to your card using strong tape to the 2.5 inch flaps centering to your natural card stock.

Decorate and you are done!!


Thanks for stopping by!! Check out some of my other posts for more fun and creative ideas! For more ideas delivered to your own inbox, sign up for my newsletters!

Jen's Crafty Place


Thursday, March 21, 2019

Birthday Card with Miss Kate Cuttables and Mickey!

I am making a quick pop up card with Miss Kate Cuttables. I decided on making a mouse card for someone who loves going to Disney. I love the simple pop up element I used in this card.


Before we get into the instructions on making this card, click HERE to get your daily freebie at Miss Kate Cuttables!!


I used a couple of Miss Kate files: Mouse Uppercase Alphabet and Mouse Balloons.

I did a print and cut with the Mouse Balloons and cut out several balloons. I then went to THIS website to make my pop up element. I used a normal A2card base and inserted the pop up element in the center. I then covered the panels of the inside of the card with some yellow mouse paper I took out of a Disney scrapbooking pack.


I added the balloons I cut out to the pop up element and then went back to my Cameo 3 to cut some letters. I used the Mouse Uppercase Alphabet to type out "Happy Birthday". I then added the sentiment to the inside of my card.


I then use some more goodies from my Disney scrapbooking pack and decorated the front of my card and I was done!! Thanks for stopping by!!


Don't forget to drop by blog for more ideas and sign up for my newsletter to get the latest posts as they are posted!

Monday, March 11, 2019

Miss Kate Cuttables March Challenge

Today I am doing the Miss Kate Cuttables March Challenge: Shamrock or Clovers

Before we get into the project don't forget to get your DAILY FREEBIE over at Miss Kate Cuttables.


I have been getting into making wine glasses and mugs lately. I am going nuts for vinyl!! I love to make gifts for my friends and family with personalized items. Vinyl is the way I do it!! Who doesn't love a personalized mug or glass?? Well.....I know I do so I made this wine glass for St. Patrick's Day!! (I am not a drinker but love to use them for sparkling cider and other punches.)

I used the following cut files from Miss Kate Cuttables:  Miss Gwen Font and St. Patrick's Day Title

If you don't like this font or my choice of shamrocks there are many others to choose from over at Miss Kate's. 


I selected my favorite font, found my favorite saying and off I went. I typed my saying in my Miss Gwen Font and sized it in my Silhouette Cameo 3 editing program.  I added in my shamrocks and then copied it TWICE on my digital mat.


I selected the wording and deleted all of it. (Don't worry, we still have the words on our other copy) That left only the shamrocks. I grouped them and moved them to the top section of my mat. This will be cut out of green vinyl.


Take the second design and remove the shamrocks and group the letters. This will all be cut from black. This procedure makes vinyl layering very easy.  Don't change anything on either of these files except removing the items I told you to. Place this design to another part of your mat away from the shamrock images. Next load your vinyl. Add black to the wording area and green vinyl to the shamrock area.  Cut out these items in one pass through your Cameo 3 or whatever program you use.


Make sure you clean your glass surface or items is clean and finger print free. I use a alcohol wipe and clean my surface and let it air dry. Then I place a clean towel on my table and then lay my glass (in this case) on the towel so it won't roll around and I can see my placement clearly.


After cutting out my vinyl make sure you weed it. Then use some transfer tape and lift the black vinyl on one piece and lift the shamrocks with another piece of transfer tape.  Lastly, add the black wording to your items and then add your green layer. Make sure you rub the vinyl down to get a good adhesion.


That's it!! Now enjoy your new wine glass with a small glass of something!!

Don't forget to drop by blog for more ideas and sign up for my newsletter to get the latest posts as they are posted!


Thursday, February 21, 2019

Miss Kate Cuttables and Vinyl

Happy New Year!! I have a bunch of new items to use this year so stay tuned for some great projects!!

Today I am doing a vinyl project for Miss Kate Cuttables. I want to remind you to head over to Miss Kate Cuttables for a daily FREEBIE!!

 
I did a adorable "love" saying with vinyl. It is layered but EASY to do. I had 2 shades of blue so I did the heart in blue. You can choose any colors or just do it with one layer of red.

I purchased the file called "Word Love Set" from Miss Kate Cuttables. This idea can be done with just about any word set so look around and find one you like. (My directions will be for the love file but the idea is the same for all.)

Open up your favorite cutting program. I used the Silhouette program to cut it with my Cameo 3.


As you can see above I took the layers apart and placed them on my mat in three places. Each item is a different color. This way I can cut them all with one pass through the cutter. I placed a piece of black vinyl at the top left large enough to fit the image "love". I then placed the two layers of the heart in the top right and bottom right of my mat, just like in the image above. I set my cutting tool to "vinyl glossy" since my vinyl is glossy and then hit "send". The machine cut them out beautifully. (I also want to mention I placed squares around each of my images for easier weeding.)


After I cut the items out I weeded them (weeding means to remove all the extra vinyl you aren't going to use for the project.) Then take some transfer tape and lift off the darker heart. Place it over the black heart space on the word "love" and adhere. Next, lift off the lighter heart and place it over the darker heart. This makes it easier to place it on the curved surface if all your layers are already on the project.


Lastly, make sure your item is clean (if using glass, use some alcohol to wipe the area down to remove any finger prints, oil from your hands or any dust) and lift the whole design with your transfer tape and adhere to your final project. Make sure you rub the vinyl down to get good adhesion. For a bonus, the tiny heart that was cut out of the larger heart, I place it at the end of my "e" for a little pop of color at the end.

That's it! Project done and ready to use!!


I hope you enjoyed today's project! Make sure you sign up for my newsletter so you don't miss any upcoming projects!