Thursday, February 22, 2018

Miss Kate Cuttables Vase of Roses

I know Valentine's day is over but this card can be used for more then just Valentine's day. Anytime you want to show someone you care with a special card, this is the one!

Before I start on how I made this card, don't forget to stop by Miss Kate Cuttables today and every day for your free svg file


I choose the Miss Kate Cuttables, "Roses in Vase" for my main image. I cut the image out after I sized the image to fit my A2 card. Use your favorite program to size it to any size you wish. You can make it larger for scrapbooking pages and smaller for note cards. Just cutting out one rose can be fun on a note card or love note. I used my favorite program Make the Cut and then saved my svg and imported it into Silhouette Cameo program to cut.

 
As I mentioned it is an A2 size card meaning it is 4.25 x 5.5 in finished size.  I took a piece of black cardstock 8.5 x 5.5 and scored at 4.25. This is my card base. I then took a piece of white cardstock and ran it though my Sizzix machine with an embossing folder with some hearts on it. This piece measures 4 x 5.25 in. I adhered it to my card front with tape runner. Next I cut out all my roses and my vase pieces. I used vellum to cut out the top layer of my vase to resemble my glass vase. The heart I used for the sentiment was just a shape I had in my cutting files. I cut that at 2.5 inch and the inner white heart at 2.25 inches.


After all the pieces were cut and assembled, I added some shimmer to my roses with a Wink of Stella pen. It is hard to see in the pictures but trust me, they shimmer!! I glued all the pieces together and added it on my card front with some foam adhesive to give it some dimension. I used a stamp set from Joy Clair Stamps to stamp my sentiment on my hearts. The set is called, "Gnome is where the heart is". 

 
On the inside I cut a white heart at 4 inches to stamp my sentiment. I used another Joy Clair stamp set called, "Love Languages". It also had the cute hearts I stamped in red inside and outside on the front of the card.


That's it! I hope you like this Love Card and hope you make one for someone special in your life!

Happy Crafting!!


Friday, February 16, 2018

Fisher of Men by Joy Clair Stamps

I'm here for another Bible Journaling page with Joy Clair Stamps and my new journaling Bibles. I found out some interesting things that I would like to pass on to you new Bible Journalers.


First let me show you some of the new products I bought for Bible journaling. I purchased the New Testament Catholic Journaling Bible. This way I can journal the Old and the New Testament.


I also purchased some CLEAR Gesso to make my pages more adaptable to water. This way my watercolor and other liquid techniques won't bleed though to the back page. I also picked up some special highlighters specifically made for Bible Journaling. The highlighters are a gel so they go on smooth like lipstick but dry quickly. They are smear proof also and do not bleed though to the back page. I got the 8 pack but there are many other size packs and brands on the marker. I purchased mine though Amazon. Just search "Bible Journaling Highlighters". 

On to the project!

1. Highlight your passages you think are important. 2. Stamp your images you would like to showcase. (I did not do this step in the correct order. Learn from my mistakes. That is why you follow this blog, right?? I used the gesso first then I found it was hard to stamp my images clearly.) I used the new stamp set from Joy Clair, Fishers of Men. 3. Water down the clear gesso a bit and apply over your stamped image and your wordings, if you plan on doing techniques over the words. 4. Wait until it dries or dry with a heat gun. The page my wrinkle a bit. It will flatten out when the Book is closed or I heard you can iron the pages with a warm iron between some clean printer paper.

As you can see above, my page wrinkled just a bit but I wasn't too concerned about it. I applied the clear gesso to the left page. (If you did it correctly you should have the stamping under the clear gesso.) 6. I wanted a watery look so I used some Distress Inks for the blue, purple and turquoise. I just used an ink blender to blend the colors.

7. Paint the fish with different colors of orange and red watercolors. It is hard to see but there is shading on them.
8. Shaded the fish with blue watercolor and use a glitter pen to add some motion to the page by making wavy lines as water current. 9. You can add more detail by splattering some paint, I used blue, about the page to add some texture dots. 10. Time to doodle. I love to doodle so I used glitter pens to trace some of the netting, outline some of the wording and the hooks. I love the sparkle it adds to the page. (I also outlined the bubbles after I did step 11.) 11. Add in some 3D bubbles. I used some Pico Embellisher to accomplish this. The bubble dry 3D and have a iridescent shimmer to them.


Hope you enjoyed this Bible Journaling page!

Tuesday, February 13, 2018

Joy Clair's Challenge: Mardi Gras

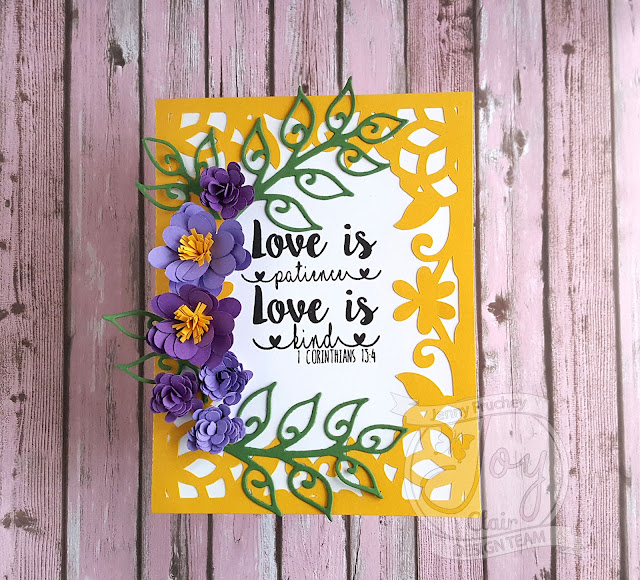
Today's post is a Challenge from Joy Clair. The challenge is Mardi Gras! I decided to use the colors Yellow, Green and Purple to make my card. Let me know what you think!


The stamp is from Joy Clair "Scriptures of Love". I love all the stamps in this set. They are great for inspiration cards as well as Bible Journaling. (Check out my post on Bible Journaling for info on how to start!) The yellow base is cut from a svg file I had. I used my Silhouette Cameo 3 to cut it out. When I don't have a die cut for my backgrounds I love to use svgs. I made the flowers from the Cuttlebug dies to make the 3D rolled flowers. Any 3D rolled flowers will work. You can use svgs too! The leaf die is from Creative Expressions, CED1483. I just put them all together to make my card.


Hope you liked my answer to the challenge: Mardi Gras!! Hop on over to Joy Clair's for more inspiration and Mardi Gras ideas!

Monday, February 12, 2018

Love Tree

Today's card is a challenge from Miss Kate Cuttables:  Red, White and Pink. I thought this Valentine's Tree fit perfectly. It can be used as a Valentine's or just a special sentiment card.


The file is called "Valentine Tree". It may look difficult but it isn't. All the tiny hearts and leaves are all on separate trees by color. No need to glue tiny hearts and leaves to the tree, just glue each colored layer to form the complete tree. I also cut out an extra bark layer and added it to the top and bent up the branches to look more 3D. For some added dimension I added a pop up heart. I took one of the hearts from the set and blew it up and cut it out 5 times. I scored each heart in half and folded them. Next I glued them all together and adhered to my card at an angle. I also added a little sketching with a brown glitter pen to resemble some of the details in the bark. This is optional. It is fun to add in tiny details like pen, marker or chalk to add shading and texture to your die cutting.


To jazz up my card a bit, I used sparkle pen on my hearts and some tiny gems to the card front.


I used the "i love you" from: Never Forget How Much I Love You Girl  file. I cut this out of black shinny card stock. I think the shinny card stock makes it more "special".

Head on over to Miss Kate Cuttable Blog to see the other designers take on Red, White and Pink!


Until next time.....Happy Crafting!


Friday, February 2, 2018

Joy Clair Valentine Background Builder and Love Language Stamps on Love Card

Hi! I'm here to show you how to make a cute Love Card for someone special. This is not only a great Valentine card but a Love Card could be given any day of the year. Why wait until Valentine's Day to tell someone you love them? I got the stamps from Joy Clair. Let's get started!

Front wide w

I used the Valentine Background Builder and the Love Languages sets to make my card. For the background paper I used Valentine Background Builder and I used Love Languages for my sentiment. My card is 4.25 x 6 inches (black paper). The background paper is 3.75 x 5.25 inches (white paper).

1

To make the background, stamp the image with a stamping tool such as this one or with an acrylic block. I stamped my sentiment in a straight line but you can choose to stamp them off set. I like the look of them all in a row. It is a cleaner look because the white space is all lined up. I used black Versafine to stamp then colored all the hearts in with a red glitter marker.

2

Next, I mounted the background paper to my card base. In this case I used black as my base. When I make cards, I usually make card fronts. The black is not a card, just the front panel. I then will take an 8.5 x 11 inch piece of white paper and cut in half horizontally. Then score that in half vertically and that is your card. One sheet of paper will provide you with 2 cards and then I adhere my card front on the front of one of the cards.

3

After the base of the card is made it is on to the sentiment. I used a stitched heart die and cut out a red heart with my Sizzix Big Kick. Then, I took the Love Languages stamp set (I chose the "i love you" stamp) and stamped it on the red heart with VersaMark. I then sprinkled it with black embossing powder and heated it.

4

With my sentiment done I arranged it on my card front where I wanted it. If you wanted a "clean and simple" card you could stop here but I wanted a bit more texture and dimension so I added some red and white twine behind my embellishment and popped it up on foam adhesive squares. I still thought I wanted more...so I used a arrow die set I had from Sizzix and cut out an arrow with a heart. I cut the arrow in half because it wasn't long enough to show if I put it behind my heart as I planned.

4

I took the little black heart that came out of my arrow tail and used it on my heart just under the words "I love you". To further add detail to my card, I used some black enamel paint to paint my heart.

 Close up w 
Regular view w

I hope you enjoyed my little project! Please stop by my blog to comment and leave me some feedback on what you would like to see more of or share a pic of your card you made following these instructions.
Until next time! Happy Crafting!!

Thursday, February 1, 2018

Joy Clair Challenge

Today I am sharing my interpretation of the Joy Clair Challenge for February 2018. Check out the images below. What does it "SAY" to you?? Below is my take on these pics.

No automatic alt text available.


I used my favorite new set from Joy Clair called "Best Buds". Not only do I love all the little critters I love all the wonderful sayings! Check out all the designers ideas and we hope you post one of your own creations!


I am not writing up a tutorial on this one. It is pretty straight forward. I used a Sizzix card making die to make the card and also the mat for my card. I used a flower die for my flowers and colored my image with Copics.

Thanks for stopping by!
Jen