Showing posts with label sizzix. Show all posts

Thursday, February 1, 2018

Joy Clair Challenge

Today I am sharing my interpretation of the Joy Clair Challenge for February 2018. Check out the images below. What does it "SAY" to you?? Below is my take on these pics.

No automatic alt text available.


I used my favorite new set from Joy Clair called "Best Buds". Not only do I love all the little critters I love all the wonderful sayings! Check out all the designers ideas and we hope you post one of your own creations!


I am not writing up a tutorial on this one. It is pretty straight forward. I used a Sizzix card making die to make the card and also the mat for my card. I used a flower die for my flowers and colored my image with Copics.

Thanks for stopping by!
Jen


Friday, October 27, 2017

Miss Kate Cuttables Guest Design Team

Hi! This is Jenny Fruchey from Jen's Crafty Place as your Guest Designer today! I can't wait to share my Halloween card with all of you!


This adorable die cut is from Miss Kate Cuttables Witch in Cauldron. This is a larger card size then the normal A2 (4.25 x 5.5). I made this card 8.5 x 5.5 so I can make the design larger. You can cut the witch in cauldron any size you would like to match your card size. That is the great thing about cutting these designs with your own cutter.


Now let's make the card!

Gather your supplies:

Purple cardstock base 8.5 x 11 inch
Black cardstock : 8.25x 5.25 and 4.25 x 5.25 inch
Purple pattern paper: 8.125 x 5.125 inch
Orange pattern paper: 4 x 5 inch
Scrap white cardstock for Sentiment
Black in Memento for Sentiment
Miss Kate's Witch in Cauldron cut from cutting machine finished size: 5.25 inch
(Scrap paper: two shades of green, two shades of orange, 2 shades grey, black, 3 shades of purple)
Rubber stamp with Halloween saying: Toil & Trouble from tailored expressions used now retired
Layered dies to cut saying: Sizzix Labels Fancy #4 the
Crafter's Companion Clear Sparkle Pen
Faux Enamel Dots: Made by Me
Foam Squares


Make your Witch in Cauldron from your Miss Kate Cuttables file. Use scrap papers to cut each layer and assemble with clear glue. Make the die cut fit the card you have decided to make. If making the size I did, assemble her to 5.25 inch total size. Add some sparkle pen to the bubbles and all parts of the insides of the cauldron. I do like sparkle so I added some to the bows on her shoes too!

Next, fold your 8.5 x 11 inch piece of purple cardstock in half for the card base and set aside.  Stamp your sentiment on white cardstock and cut with your favorite shape die. I used Sizzix Labels Fancy #4. Cut out a shadow layer, I used black with the same die set.

Cut your black mats, purple pattern paper and orange pattern paper to the sizes above. Adhere with tape or glue on the purple card base. Add the die cut and the sentiment with foam squares, add faux enamel dots and you are done!

Happy Crafting and Happy Halloween!!
Be sure to drop by my blog and please subscribe for more fun ideas: http://jenscraftyplace.blogspot.com/

Sunday, May 28, 2017

Art Impressions and Crafter's Companion Spectrum Noir Alcohol Markers


This cute stamped image is from Art Impressions. It is colored with Crafter's Companion Spectrum Noir alcohol markers. I love all the colors they have and they are all refillable! Very affordable vs other alcohol markers.


I did very simple shading. It is easy with alcohol markers to get a smooth shade.


The bottom is decorated with Tim Holtz's Trick or Treat Shadow die. It has many Halloween elements on it, I only used a few. I also added some glitter pen from Spectrum Noir on the owl as well as google eyes on the owl and bats. I like that it adds a bit of whimsy to the card. It was a fun and easy card to put together. You don't have to have the same elements as I do, just use the card sketch and see what you can come up with!

Saturday, March 19, 2016

3D Flower Card

 
Today's card is a 3D flower card. Any 3D flowers can be used to make this card. If you don't have any 3D flower dies you can always use store bought ones. I just added some washi tape for the background and to add some dimension to the background I used a Sizzix die.  Dimensional foam was used behind the green border to pop it up a big. I added the sentiment from the Celebrate set by Sizzix. To avoid needing a larger envelope, I cut some of the card front down then added a decorative strip of pink loops cut from the same Sizzix border set. The dots at the top are Perler beads melted down. (I love the glitter looks so I also added some Wink of Stella to my flowers.)
 
 
This washi background is great for any kind of card base. Just add a die cut or Stamped image and you are good to go!


Tuesday, January 19, 2016

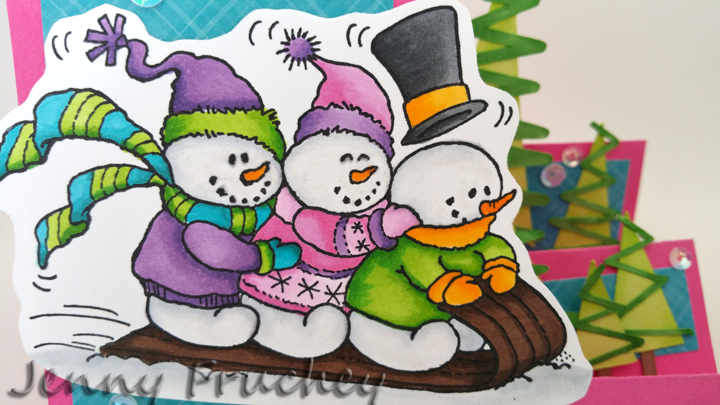
Sledding Fun!


This colorful card will brighten up anyone's day! I have a sentiment for Christmas but you can add "Let It Snow" to the bottom for a fun, winter "pick me up" card!

I stamped the playful snowman image from Stampendous Impressions on Copic friendly paper.  (Not sure of the name but the code was CRP234. If you can't find this exact stamp set, use another snowman image.)  My paper was Neenah solar white cardstock and I used Memento Tuxedo Black ink which is also Copic friendly. Stamp your image and color it. Cut the design out leaving a small border around the image.


For the card base there are several options. I used a Sizzix die for my base and background papers. You can also use a Silhouette cut file from Lori Whitlock. Both options will give you the same result. Cut out a base in desired color using cardstock. Then cut liner papers that coordinate with your base paper. I used pink cardstock and a bright blue for my base papers. Scrap paper works great for these pieces! Attach papers to base after they are cut out and add your main image to front of card as shown.


To add interest to the side, I cut out some triangle scribble trees in various sizes from the Silhouette Design Store. They vary in size from 1 inch to 3.5 inches tall. (Including stumps)
Add the trees to the side steps in a staggering fashion. I used some dimensional foam squares to pop up some of the trees to add some extra dimension.


Cut a sentiment out of cardstock using your die cutting machine and your favorite font or use a die. I used "Merry Christmas" die from Lawn Fawn. Like I said above, if you want to use this as a winter card you can use "Let It Snow" from Lawn Fawn or any other sentiment you would like. You could even stamp one! This would make a great birthday card also by using "Happy Birthday" by Lawn Fawn. I love Lawn Fawns dies! (as if you couldn't tell....)

You could be done at this point or go the extra mile, like I did, and add some sequins!

STAY WARM MY FRIENDS!!

Art Impressions Snowman Shaker


This cute Snowman Shaker card design is from Art Impressions. The packages and his arms are separate and they "wiggle". They are mounted on an Action Wobble. It is fun watching people's reactions when they receive these cards. They are so interactive and fun!

Let's make the card!

Stamp your snowman image and the arms with packages on some card stock. I used my Copics to color the image so I used Neenah solar white cardstock and Memento Tuxedo Black ink to stamp the image. Memento is Copic friendly as well as the Neenah paper. If you plan on using colored pencils or other color mediums use the correct paper for your medium. Color your image.


Cut out the snowman and the spare arms and set aside for now. Use a paper punch or die and cut out a snowflake. I used my Silhouette Cameo to cut out a 2 inch snowflake and paper punch for the 3/4 inch circle. I stamped "be merry" from a stamp set and inked the edges with light blue ink. To add some extra sparkle I used some Wink of Stella on the snowflake. Use a dimensional foam square to attach the circle to the snowflake.

The card base is one I use over and over. It is the Sizzix Framelits Kind Sentiments Step Up Card set. Not only does it have the base die but they also have dies for the side and base papers already sized to fit exactly on your project. No more measuring for that perfect quarter inch border! I love the fact that I can use scrap papers for these cards because I can position the die over my scrap and make sure there is enough paper before I cut. Let's face it, we all love to use up our scraps so we don't have to bust into a whole piece of paper from our stashes! (Yes, I am a paper hoarder!)

Pick your papers and cut out a base with cardstock. You can use decorative papers for the side and base layers. There are even fun dies included in the Framelits set that will do some fancy cutting to the side panels, no paper required. I choose some polka dot papers I had left over from a previous project and some blue scrap that I used for the background of the main image.


Attach your snowman to the base. Attach your wobble to the back of the arms and then adhere to snowman. If you attach the wobble to the base first you may see it peeking out from behind the arms. (It is best to attach to the back of the arms so you can position it where it won't show.)

Now it is time to attach the snowflake to the bottom left of the snowman. At this point you can be done but to add a little more interest I added some button snowflakes I had in my stash. If you don't have any buttons shaped like snowflakes you could add some snowflake punches or some sequins.


Monday, December 21, 2015

Paper Crafting World's Elf on a Shelf

My elf came off the shelf and is just popping in to say, Merry Christmas! I used the Paper Crafting World's Elf on the Shelf Boy Cut File, for this easy Christmas card. I know it is almost Christmas but this is easy enough to make in a rush.


I cut him out, inked the edges with Dew Drops ink pads and assembled him. I cut a circle with a sizzix scallop circle die and layered that over red dot scrapbook paper. I added that over a plaid piece of scrapbook paper and adhered it to a red A2 card.


To finish the card off, add embellishments you have in your stash. I had some red faux enamel dots I used as berries (I also used a yellow dot for a button) and hand cut some green paper for some holly leaves. I added them in the corners and a baby bow under the banner. The baby bow is from Paper Smooches. If you don't have a bow die, use ribbon to tie a bow and glue on with glue dots, add a banner stamped with your favorite holiday greeting and you are done! (You can use a die to cut the banner, a cut file of a banner or free hand one.)


I hope you enjoyed this easy Christmas card. I want to wish you all a Merry Christmas and hope you check back in the new year for more fun and easy projects!

Monday, November 23, 2015

Gingerbread Easel Card


Making an easel card is fun and easy! I used the adorable gingerbread people from the All Baked Out set over at Paper Crafting World. There are a lot of cute files included in this collection. I used the single man and woman. You can easily use the other designs such as the border people or the title on the base of this card.

Let's make a card!!


I used a die for the base of my card. It is from Sizzix. You can use any stand up bases you like. Silhouette has many in the design store and you can always cut one by hand too. Once you have your base cut from red card stock, decorate it with some patterned paper. I use Christmas papers from Recollections Sugar Plum pad. It was sold by Michael's a few years back but any papers will do.

Cut a white piece of card stock and stamp a greeting. I used a stamp from my stash. I used Stazon black ink and then antiqued the edges of the cut shape with some tea dye Distress Ink.

Cut the cute gingerbread people out your die cut machine. I used my Silhouette Cameo. I inked all the pieces with Distress Inks that matched my papers. I used all solid papers for these cuties. Assemble the folks. Decorate them if you would like with 3D elements to add interest. I added buttons made from melted Perler beads.


I cut the candies out from red and white card stock. I used a red permanent marker to add some extra lines to match my candy paper, this is optional. Add some Glossy Accents to the candy die cuts to add dimension. Let them dry before you attach them. I also added a dot of white acrylic paint with a tooth pick to their cheeks to finish off their faces.

As for the bottom "joyful" embellishment. I used a die from Sizzix. I cut it out three times and glued them together for dimension.


Glue on all your embellishments and you are done!! This card can be folded flat to mail and propped up to display!!


Sunday, May 3, 2015

Easter Bunny Pop Up

People love to receive pop up cards. They are as fun to make as they are to receive. I made this for a family member for Easter. I made the front cover (hop, hop, hop) from a file the Silhouette design store. The die on the bottom is from Spellbinders Card Creator. The paper was from my paper stash.

This is the inside of my pop up card. I used Karen Burniston's lots of pops die. It is my "go to die" when I am making pop up cards. The fancy labels are from sizzix and the cute bunny is from kadoodlebug. I used a neat grass die from Lawn Fawn.