I made this sweet Bebunni birthday card with Crafter's Companion's stamp set called Yum, Yum, Yum. I colored him with Spectrum Noir alcohol markers. They are fun to color with and easy to get professional blends and textures.
Here is a close up of the bunny's fur texture. I colored the bunny with grey markers and then used the colorless blender to get the texture. I used a small piece of terry cloth towel, then added the colorless blender to the cloth and just tapped the image where I wanted the texture. I colored the bunny then did the texture technique before I colored any other part of the image. That way I didn't have to worry about accidentally getting blender on other parts of my design.
Check out Crafter's Companion on Facebook or Pinterest for more ideas and projects!
Showing posts with label bunny. Show all posts
Thursday, April 13, 2017
Sunday, February 28, 2016
Paper Crafting World's Chicky in Bunny Ears
Hi again! I'm here with an adorable chicky dressing up as a bunny. You can use this for spring or Easter card. I guarantee it will put a smile on everyone's face!
Let's make this one step by step!
Purchase your Chicky in bunny ears cut file and open it up in your favorite cutting program. I used Silhouette and my Cameo to cut it out. Choose the file associated with your cutting program. I used svg.
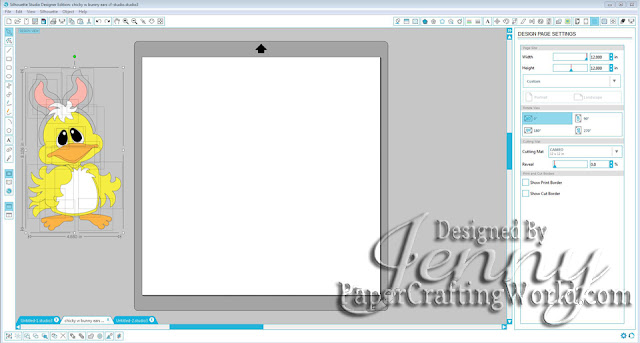
As you can see from the pic above, the file opened up very large. We will size it now. Select the whole image and drag it off the mat. I am right handed so I dragged it off to the right.
Next select each colored piece from the full image and place them on your mat according to color. The image below is how I set up my mat. As you can see the chick is very large.
We are about to change the size now. If you want an exact size of how the chick will be when assembled you can select the chick while he is all together and resize him or do it as I did in the next step. After I placed all the pieces in colored groups I "selected all" the pieces on the mat and then grabbed the bottom right arrow and moved the shapes to the desired size. I was looking at the eyes. I wanted the eyes to be approximately 1/2 inch.
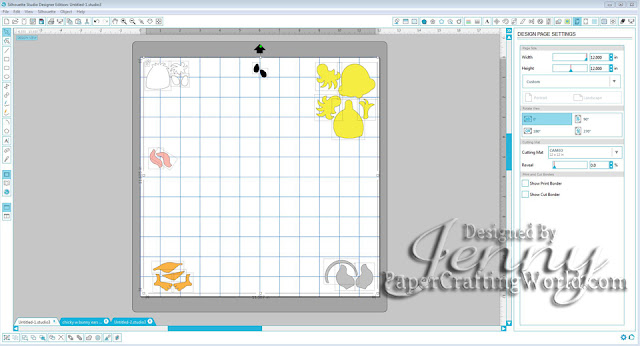
I then rearranged them on the mat. Now, time to set up the real mat with my papers. This way you only have to cut ONCE. If you are more comfortable cutting one color out at a time, then you can remove all pieces once again to the right of the mat and place one color group on at a time and cut. I like to do it all at once. I can also use up my scrap paper this way. Just make sure you follow your grid lines to know where to place your papers. My mat is old so I have to tape my papers on so they don't move while the cutter is cutting. I use a low tack painters tape I bought at my local dollar store.
Load your mat into your cutting machine and cut out your file. Don't forget, if you are using the Cameo you have to have your machine set on "CUT" in order for the machine to find your cut lines. This is also where you set your material, blade depth, pressure and other cut settings.
Once your pieces are all cut out, arrange them on some scrap paper to get ready for coloring your edges. This step is optional but it does add depth and dimension to your project without adding bulk. The chick can be assembled without this step.
I used Dew Drops to ink my edges but you can use pastels, chalks, Distress inks, whatever you have on hand is fine.
After all the pieces are colored, time to assemble the little guy. I used glue. You can use tape but glue is more forgiving if you get a piece in the wrong place. With glue you can move the pieces after you place them together, with tape once you place it down, it's stuck.
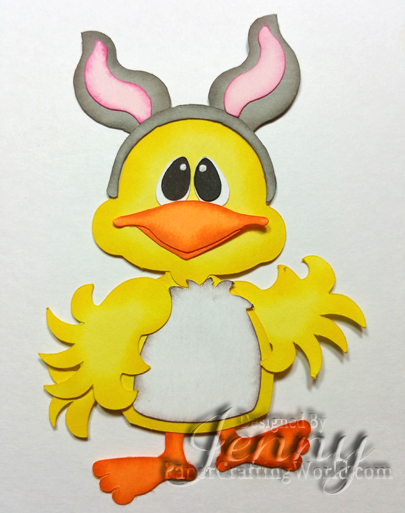
Now that our chick is complete, we can assemble the card. I used Lawn Fawn Small stitched Rectangle Stackables , Large Stitched Rectangles Stackables and Stitched Hillside Borders.
My card is 4.25 x 5.5. This is a standard A2 card. I used an orange starred paper from MultiCraft that I purchased at my local dollar store. Any decorative papers will work. Just use what you have. If you want more of an Easter feel, use paper with Easter eggs! I cut this layer to the size of my card front of 5.5 x 4.25 using the stitched die. Next, I cut my striped paper from another pad I purchased from my dollar store called Glimpses by Signifypink. This measures 5 x 3.75 again using a stitched rectangle. My last white cardstock layer was cut using stitched rectangle 4.5 x 3.75. I ran this white piece through my Sizzix Big Kick using a cloud embossing folder by Darice.
The ground was cut using the Lawn Fawn Stitched Hillside Borders using a scrap piece of green printed paper approximately 3 x 1.25. Adhere the hill to the bottom of your white paper. Attach all the papers according to size like the image above. Add the chicky on the hillside. I used foam adhesive to pop him up a bit. Lastly, I added some faux enamel dots to the bottom right of my card for a splash of color!
Thanks for joining me! I hope you like my Spring card. Give it a try and let me know how yours comes out! Post some pictures in the reply box, I would love to see how you embellished your card!!!
Click here to follow my blog with Bloglovin.
Purchase your Chicky in bunny ears cut file and open it up in your favorite cutting program. I used Silhouette and my Cameo to cut it out. Choose the file associated with your cutting program. I used svg.
As you can see from the pic above, the file opened up very large. We will size it now. Select the whole image and drag it off the mat. I am right handed so I dragged it off to the right.

Next select each colored piece from the full image and place them on your mat according to color. The image below is how I set up my mat. As you can see the chick is very large.
We are about to change the size now. If you want an exact size of how the chick will be when assembled you can select the chick while he is all together and resize him or do it as I did in the next step. After I placed all the pieces in colored groups I "selected all" the pieces on the mat and then grabbed the bottom right arrow and moved the shapes to the desired size. I was looking at the eyes. I wanted the eyes to be approximately 1/2 inch.

I then rearranged them on the mat. Now, time to set up the real mat with my papers. This way you only have to cut ONCE. If you are more comfortable cutting one color out at a time, then you can remove all pieces once again to the right of the mat and place one color group on at a time and cut. I like to do it all at once. I can also use up my scrap paper this way. Just make sure you follow your grid lines to know where to place your papers. My mat is old so I have to tape my papers on so they don't move while the cutter is cutting. I use a low tack painters tape I bought at my local dollar store.
Load your mat into your cutting machine and cut out your file. Don't forget, if you are using the Cameo you have to have your machine set on "CUT" in order for the machine to find your cut lines. This is also where you set your material, blade depth, pressure and other cut settings.
Once your pieces are all cut out, arrange them on some scrap paper to get ready for coloring your edges. This step is optional but it does add depth and dimension to your project without adding bulk. The chick can be assembled without this step.
I used Dew Drops to ink my edges but you can use pastels, chalks, Distress inks, whatever you have on hand is fine.
After all the pieces are colored, time to assemble the little guy. I used glue. You can use tape but glue is more forgiving if you get a piece in the wrong place. With glue you can move the pieces after you place them together, with tape once you place it down, it's stuck.

Now that our chick is complete, we can assemble the card. I used Lawn Fawn Small stitched Rectangle Stackables , Large Stitched Rectangles Stackables and Stitched Hillside Borders.
My card is 4.25 x 5.5. This is a standard A2 card. I used an orange starred paper from MultiCraft that I purchased at my local dollar store. Any decorative papers will work. Just use what you have. If you want more of an Easter feel, use paper with Easter eggs! I cut this layer to the size of my card front of 5.5 x 4.25 using the stitched die. Next, I cut my striped paper from another pad I purchased from my dollar store called Glimpses by Signifypink. This measures 5 x 3.75 again using a stitched rectangle. My last white cardstock layer was cut using stitched rectangle 4.5 x 3.75. I ran this white piece through my Sizzix Big Kick using a cloud embossing folder by Darice.
The ground was cut using the Lawn Fawn Stitched Hillside Borders using a scrap piece of green printed paper approximately 3 x 1.25. Adhere the hill to the bottom of your white paper. Attach all the papers according to size like the image above. Add the chicky on the hillside. I used foam adhesive to pop him up a bit. Lastly, I added some faux enamel dots to the bottom right of my card for a splash of color!
Thanks for joining me! I hope you like my Spring card. Give it a try and let me know how yours comes out! Post some pictures in the reply box, I would love to see how you embellished your card!!!
Click here to follow my blog with Bloglovin.
Labels:
bunny,
Cameo,
Card,
Chicky with Bunny Ears,
clouds,
dew drops,
Easter,
embossing folders,
enamel dots,
Inking,
Silhouette,
Spring
Sunday, May 3, 2015
My Scrap Chick Easter Card
I purchased this file from My Scrap Chick. It was a lot to put together but the end result was amazing! I made 4 of these at one time. It took me 3 days to complete them! I cut them all out one evening. The next evening I spent inking and decorating all the tiny pieces and the third evening I put everything together. I love the trifold card design and all the cute faces! I did make the card a bit larger then the original file. I accomplished that in my silhouette design edition software for my cameo. The embossing folders I used for each of the backgrounds were Darice.
Labels:
bunny,
Cameo,
Card,
card making,
Chick,
Easter,
Happy,
my scrap chick,
Silhouette,
Trifold
Easter Bunny Pop Up
People love to receive pop up cards. They are as fun to make as they are to receive. I made this for a family member for Easter. I made the front cover (hop, hop, hop) from a file the Silhouette design store. The die on the bottom is from Spellbinders Card Creator. The paper was from my paper stash.
This is the inside of my pop up card. I used Karen Burniston's lots of pops die. It is my "go to die" when I am making pop up cards. The fancy labels are from sizzix and the cute bunny is from kadoodlebug. I used a neat grass die from Lawn Fawn.
Labels:
bunny,
Card,
card making,
Easter,
egg,
hop,
kadoodlebug,
Karen Burniston,
lots of pops,
pop up,
Silhouette,
sizzix
Friday, February 28, 2014
Bunny Love
I have been playing around in the studio and came up with this cute bunny card. The image is from Lili of the Valley. It is a simple layout embellished with some flowers from Prima, a few leaves from two Martha Stewart punches and a bit of sparkle from my wink of stella pens. The pink gingham is from Making Memories Background Basics, Pastel Pink Gingham item # 14447. I don't know where I bought the floral paper from, it was in my stash, but the solid papers were from my Recollections Pack from Michael's. I used Prisma colored pencils to color the image and odorless mineral spirits (oms) to blend.
Labels:
bunny,
Card,
colored pencils,
Easter,
Gamsol,
Lili of the Valley,
mineral spirits,
wink of stella
Subscribe to:
Posts (Atom)


