Showing posts with label Cameo. Show all posts

Monday, April 9, 2018

Miss Kate Cuttables Challenge: Woodland Animal

Today I am doing the Miss Kate Cuttable Challenge. The challenge is making something using a woodland animal. This is what I came up with.


 My school owl bookmark is an easy and fast project for a student or for yourself! I used the School Words Set and the Reading Owl set from Miss Kate Cuttables.


After you open up the Reading Owl set, I lay it all out on ONE mat so I can cut it all in one pass.


I then assemble the owl with all my pieces.


I cut some white cardstock and cut it 2 inch by 6 1/5 inches and cut some decorative paper to cover each side of the book mark base which is the cardstock. I used glue but you can use double sided tape. 


I cut the word "reading" out from the School Words Set. I took away all surrounding papers and used some transfer tape to pick up the word and add glue to the back and adhered it to my bookmark.


That's it! It's ready to keep your place in your favorite book!


I hope you can join us at Miss Kate Cuttable's Blog to join our challenge. Don't forget to post your project!

Until next time, Happy Crafting!!


Sunday, February 28, 2016

Paper Crafting World's Chicky in Bunny Ears

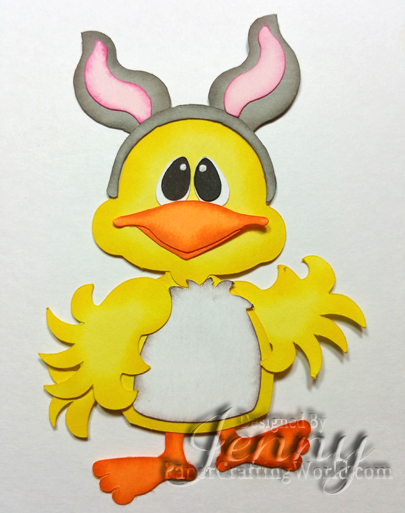
Hi again! I'm here with an adorable chicky dressing up as a bunny. You can use this for spring or Easter card. I guarantee it will put a smile on everyone's face!

 
Let's make this one step by step!

Purchase your Chicky in bunny ears cut file and open it up in your favorite cutting program. I used Silhouette and my Cameo to cut it out. Choose the file associated with your cutting program. I used svg.


As you can see from the pic above, the file opened up very large. We will size it now. Select the whole image and drag it off the mat. I am right handed so I dragged it off to the right.
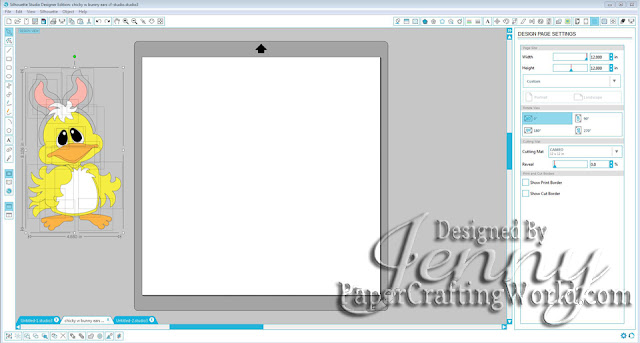


Next select each colored piece from the full image and place them on your mat according to color. The image below is how I set up my mat. As you can see the chick is very large.


We are about to change the size now. If you want an exact size of how the chick will be when assembled you can select the chick while he is all together and resize him or do it as I did in the next step. After I placed all the pieces in colored groups I "selected all" the pieces on the mat and then grabbed the bottom right arrow and moved the shapes to the desired size. I was looking at the eyes. I wanted the eyes to be approximately 1/2 inch.
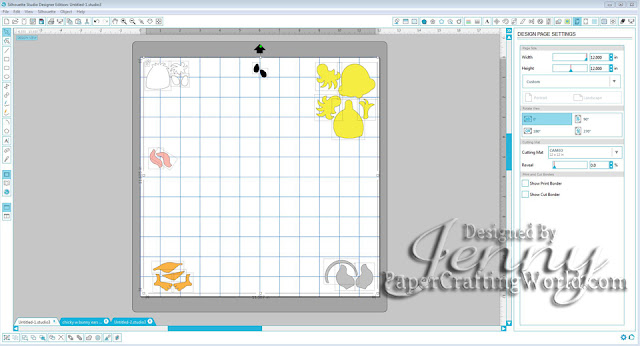


I then rearranged them on the mat. Now, time to set up the real mat with my papers. This way you only have to cut ONCE.  If you are more comfortable cutting one color out at a time, then you can remove all pieces once again to the right of the mat and place one color group on at a time and cut. I like to do it all at once. I can also use up my scrap paper this way. Just make sure you follow your grid lines to know where to place your papers.  My mat is old so I have to tape my papers on so they don't move while the cutter is cutting. I use a low tack painters tape I bought at my local dollar store.


Load your mat into your cutting machine and cut out your file. Don't forget, if you are using the Cameo you have to have your machine set on "CUT" in order for the machine to find your cut lines. This is also where you set your material, blade depth, pressure and other cut settings.


Once your pieces are all cut out, arrange them on some scrap paper to get ready for coloring your edges. This step is optional but it does add depth and dimension to your project without adding bulk. The chick can be assembled without this step.


I used Dew Drops to ink my edges but you can use pastels, chalks, Distress inks, whatever you have on hand is fine.


After all the pieces are colored, time to assemble the little guy. I used glue. You can use tape but glue is more forgiving if you get a piece in the wrong place. With glue you can move the pieces after you place them together, with tape once you place it down, it's stuck.


Now that our chick is complete, we can assemble the card. I used Lawn Fawn Small stitched Rectangle Stackables , Large Stitched Rectangles Stackables and Stitched Hillside Borders.

My card is 4.25 x 5.5. This is a standard A2 card. I used an orange starred paper from MultiCraft that I purchased at my local dollar store. Any decorative papers will work. Just use what you have. If you want more of an Easter feel, use paper with Easter eggs! I cut this layer to the size of my card front of 5.5 x 4.25 using the stitched die. Next, I cut my striped paper from another pad I purchased from my dollar store called Glimpses by Signifypink. This measures 5 x 3.75 again using a stitched rectangle. My last white cardstock layer was cut using stitched rectangle 4.5 x 3.75. I ran this white piece through my Sizzix Big Kick using a cloud embossing folder by Darice.


The ground was cut using the Lawn Fawn Stitched Hillside Borders using a scrap piece of green printed paper approximately 3 x 1.25. Adhere the  hill to the bottom of your white paper. Attach all the papers according to size like the image above.  Add the chicky on the hillside. I used foam adhesive to pop him up a bit. Lastly, I added some faux enamel dots to the bottom right of my card for a splash of color!

Thanks for joining me! I hope you like my Spring card. Give it a try and let me know how yours comes out! Post some pictures in the reply box, I would love to see how you embellished your card!!!

Click here to follow my blog with Bloglovin.

Tuesday, January 19, 2016

Miss Kate Cuttables "Hello"


This adorable phone file is a Miss Kate Cuttables. I made the file larger to make it into a card.


Let's make the card!

First open the phone file up in your favorite cutting program. I used my Silhouette program and cut it with my Cameo. I sized it to 4 1/2 inches (If you want it to fit an A2 envelope, size the card to 4 1/4). I made a copy of the base card, flipped it, overlapped it a tiny bit on the original phone base and then welded it together. This is how you make a card base for any of your die cuts in a cutting program. (If you are confused, I will have a post coming soon with step by step photos on how to make a card from a die cut.)

Next cut out all your phone pieces in the color cardstock you would like. (You don't have to pick the same colors as I did. Be creative! Use scrap paper you may have for the smaller pieces.) Ink all your pieces with coordinating inks. I used Dew Drop inks to ink my papers. To add some interest use textured papers for the phone base or run the papers though an embossing folder.


Assemble your phone pieces and add them to your phone card base. My card base was white, so my phone cord was white. If you desire a different color phone cord, use colored paper for your card base. For added dimension I popped up my heart on the dial with foam adhesive. I even added some bling to it with some Wink of Stella.


I cut out the "hello" sentiment (also used Wink of Stella) and attached it to the inside of my card.


At this point you are DONE! You can use an A7 envelope or make a special one with an envelope maker.

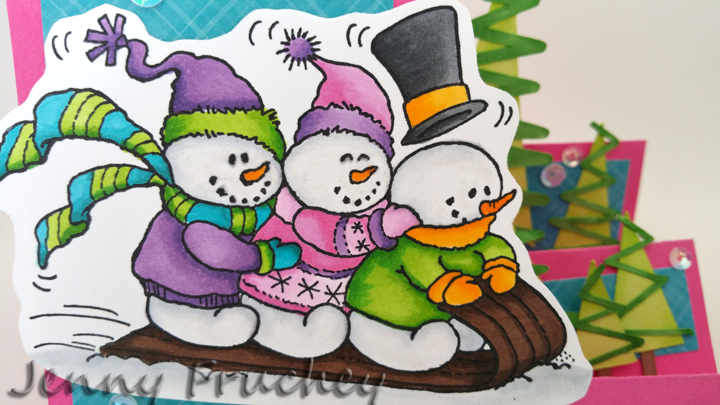
Sledding Fun!


This colorful card will brighten up anyone's day! I have a sentiment for Christmas but you can add "Let It Snow" to the bottom for a fun, winter "pick me up" card!

I stamped the playful snowman image from Stampendous Impressions on Copic friendly paper.  (Not sure of the name but the code was CRP234. If you can't find this exact stamp set, use another snowman image.)  My paper was Neenah solar white cardstock and I used Memento Tuxedo Black ink which is also Copic friendly. Stamp your image and color it. Cut the design out leaving a small border around the image.


For the card base there are several options. I used a Sizzix die for my base and background papers. You can also use a Silhouette cut file from Lori Whitlock. Both options will give you the same result. Cut out a base in desired color using cardstock. Then cut liner papers that coordinate with your base paper. I used pink cardstock and a bright blue for my base papers. Scrap paper works great for these pieces! Attach papers to base after they are cut out and add your main image to front of card as shown.


To add interest to the side, I cut out some triangle scribble trees in various sizes from the Silhouette Design Store. They vary in size from 1 inch to 3.5 inches tall. (Including stumps)
Add the trees to the side steps in a staggering fashion. I used some dimensional foam squares to pop up some of the trees to add some extra dimension.


Cut a sentiment out of cardstock using your die cutting machine and your favorite font or use a die. I used "Merry Christmas" die from Lawn Fawn. Like I said above, if you want to use this as a winter card you can use "Let It Snow" from Lawn Fawn or any other sentiment you would like. You could even stamp one! This would make a great birthday card also by using "Happy Birthday" by Lawn Fawn. I love Lawn Fawns dies! (as if you couldn't tell....)

You could be done at this point or go the extra mile, like I did, and add some sequins!

STAY WARM MY FRIENDS!!

Monday, November 23, 2015

Gingerbread Easel Card


Making an easel card is fun and easy! I used the adorable gingerbread people from the All Baked Out set over at Paper Crafting World. There are a lot of cute files included in this collection. I used the single man and woman. You can easily use the other designs such as the border people or the title on the base of this card.

Let's make a card!!


I used a die for the base of my card. It is from Sizzix. You can use any stand up bases you like. Silhouette has many in the design store and you can always cut one by hand too. Once you have your base cut from red card stock, decorate it with some patterned paper. I use Christmas papers from Recollections Sugar Plum pad. It was sold by Michael's a few years back but any papers will do.

Cut a white piece of card stock and stamp a greeting. I used a stamp from my stash. I used Stazon black ink and then antiqued the edges of the cut shape with some tea dye Distress Ink.

Cut the cute gingerbread people out your die cut machine. I used my Silhouette Cameo. I inked all the pieces with Distress Inks that matched my papers. I used all solid papers for these cuties. Assemble the folks. Decorate them if you would like with 3D elements to add interest. I added buttons made from melted Perler beads.


I cut the candies out from red and white card stock. I used a red permanent marker to add some extra lines to match my candy paper, this is optional. Add some Glossy Accents to the candy die cuts to add dimension. Let them dry before you attach them. I also added a dot of white acrylic paint with a tooth pick to their cheeks to finish off their faces.

As for the bottom "joyful" embellishment. I used a die from Sizzix. I cut it out three times and glued them together for dimension.


Glue on all your embellishments and you are done!! This card can be folded flat to mail and propped up to display!!


Thursday, September 17, 2015

Paper Craft World's Chico the Chihuahua


 I love this Chihuahua file from Paper Craft World. This is also a September Challenge from Paper Craft World's Blog. The challenge is: Anything Goes. The Twist: Use a digital or stamped image.

Here's how to made the card!

  1.  Cut the pieces of the Chihuahua out with your favorite die cutting machine. I used my Silhouette Cameo
  2. Ink all the pieces with distress inks. Whatever paper you use, choose an ink to match. The papers I used were Recollection from Michaels. Assemble the dog and glue together.
  3. Cut your backing paper to fit a 5x7 card base. I used a bone pattern from Die Cuts with a View (DCWV) paper pad called "The Pets Stack." Attach your base paper to your card base with an ATG tape gun or any tape runner.
  4. Cut a piece of 3.5x5 inch piece of paper and use a corner chomper to round the corners. My dog names paper was from DCWV "The Pets Stack."  I am not sure this is still available so use any papers you think would go with your card.
  5. For your border strip, cut a 2x7 inch piece of solid brown paper as your base and layer a 1.5x7 inch piece of decorative paper over it.  My puppy paw print paper was from a 8.5x8.5 inch paper pad by daisy hill called "Top Dog."
  6. Attach a ribbon to the border strip and adhere to card with tape. Tie the bow separately and use glue dots to attach the bow.
  7.  Now for the twist, which is optional. In Microsoft Word, type "Ruff Day" about an inch tall. Then use the stamp and die set from Lawn Fawn "A Birdie Told Me " to stamp the talk bubble in versa fine around the word group and cut it out with the matching die set.
  8.  Attach the die cut of the dog and the talk bubble with 3D foam tape. You are done!


Saturday, August 22, 2015

Best Witches

 This card was cased from a card I saw on the internet but I don't remember where I saw it, sorry.
I used my Silhouette to cut the cauldron. The background was stamped with a Stampin' Up background stamp with versa mark on a purple background. I layered that on a green paper and put that on a basic black card base. Reminder, before you apply the green layer to the black base add twine. That way you don't see the twine from the inside of the card. (If you forget, use a craft knife to make a slit in the fold of the card and insert twine.) I stamped Best Wishes and cut to resemble a banner and inked the edges with green ink and applied to the corner with tape. 


To add some dimension to the brew, I used some glossy accents to resemble bubbles. There was very little inking on this card. A touch on the tag and some on the base of the cauldron. I used dimensional squares to attach it to the front of the card. 
 
 
I stamped the inside saying from a Stampin' Up stamp on some green card stock, added some twine and three faux enamel dots. The dots were made by melting down some Perler beads. Tapped the green decorated paper to the inside of the card and I was done!

Sunday, May 3, 2015

My Scrap Chick Easter Card

I purchased this file from My Scrap Chick. It was a lot to put together but the end result was amazing! I made 4 of these at one time. It took me 3 days to complete them! I cut them all out one evening. The next evening I spent inking and decorating all the tiny pieces and the third evening I put everything together. I love the trifold card  design and all the cute faces! I did make the card a bit larger then the original file. I accomplished that in my silhouette design edition software for my cameo. The embossing folders I used for each of the backgrounds were Darice.

Box card mania!

Once I saw the cute box cards at SVG CUTS I knew I had to have them!! I made this adorable love mailbox for my hubby for Valentine's day. I didn't have to mail it but it's good to know that all box cards lay flat and fit into an A2 envelope and require no extra postage. This was cut using my silhouette cameo.

Diet Joke

I made this pop up card for a family member as a joke. She loved it! I used Karen Burniston's Lots of Pops die. The stamp is from Art Impressions. I colored it with copics using basic shading. The faux m&m's are melted perler beads. The cute paper is from DCWV Sweet Stack.

Shaker Fun!


It's been a while since I made a shaker. I used to make them all the time in my scrapbooks. I made this cute little shaker card with my Silhouette Cameo. The two files I used were from Miss Kate Cuttables. Pet fish Set and fish in a bowl from the Silhouette Design Store also by Miss Kate Cuttables. The decorative paper was paper from my stash, card stock from Michael's and sequence and beads from my dollar store. The twine was from Annie's Paper Boutique.

I cut a window of a fish bowl on the front of my card using my silhouette. I also cut two fish bowl outlines to hold the recycled plastic in place for the shaker. Next I cut all the fish elements from the Michael's card stock and glued them on the inside of the card showing through the fish bowl window. Before adding the shaker elements, I placed my decorative paper where I wanted it to be on the front of the card, traced the opening from the inside.

Then I cut out the fish bowl shape with scissors. I added a piece of recycled plastic cut 1/2 of an inch larger then the fish bowl opening and glued it to the outside of the card. Then took the decorative paper and taped it over the plastic and added the outline of the fish bowl to cover any edges. On the inside of the card, I added beads and sequence to the plastic fish bowl.

This next part is really important, you need to use double sided foam adhesive tape to make the shaker work. I used the tape around the opening of the fish bowl to seal in all the shaker goodies. I cut the tape to make long 1/8 inch strips and completely surround the fish bowl opening and then laid another piece of recycled plastic over the tape. I glued the fish bowl outline over the plastic to cover the tape. I also added the twine to the top of the card for decoration. I made a slit in the fold of the card to feed through the twine. Lastly, I added the fish food container.