Showing posts with label side step card. Show all posts

Tuesday, September 25, 2018

Joy Clair Barn Party and Blessed Harvest

Today I used 2 sets from the new release over at Joy Clair Stamps. You can view the entire release HERE.


These are so fun!! I used "Blessed Harvest" and "Barn Party". They go together so well! I made a side step card base with white card stock using my Silhouette Cameo 3.Then I cut out some patterned paper to fit over the panels that face forward.


Next, I used some Copic friendly paper and stamped my images with Memento Tuxedo Black ink. I used my MISTI so if I didn't get a good image, I could just reink and restamp without lining them up.


I then colored all my images with my Copics. After I was done coloring, I cut out all my designs with scissors. (you can also use your Cameo or favorite cutting machine using the cut files provided by Joy Clair when you purchase your stamps)
I like to cut with scissors (fussy cut), it relaxes me. I set my images aside and started to design my card.


I used glue and planned how I wanted to layout all my images. When I got them all glued on, I thought it needed some grass. I rooted though my die cuts and found some tufts of grass to use. I glued them around where I thought they would look best.


Lastly, I used the "Hay There" stamp to stamp my sentiment on to some white paper and mounted it on some red cardstock. Cut them both out and glued it to the center fold.

That's it!


Thank you for joining me! Don't forget to sign up for my email to receive all the new posts right away!

Happy Card Making!!


Monday, January 25, 2016

Snow Fun Side Step Card

Hi! I'm here to make a fast and most importantly adorable snowman card!


I used the snowman from Snow Fun Layout at Paper Crafting World to make this side step card. Let's get started!

Cut out the snowman from the Snow Fun Layout set  at the size it opens up in your program. It is a little over 5 inches assembled. Use any colors you would like for your little man. I used purples for his scarf and hat. My papers are all from Recollections. (To add more interest use patterned papers!) Next, cut 4 snowflakes from the same file. Cut one a bit larger than the others for the message.

For the side step card: I used a Sizzix die but you can also use a silhouette design or even free hand one. Use paper that coordinates with your snowman's hat and scarf.


After you have all your pieces cut it is time to ink the edges. This is not mandatory but it does add more depth to the card. I used Dew Drop inks and a sponge dauber to ink around the edges of my pieces for my snowman. I used some light pink on his cheeks to make him blush. You can also do the snowflakes if you would like. Just be careful the sponging may bend the fragile cuts.

Now time to assemble the snowman. If you aren't mailing the card you could use dimensional squares to pop out his features. I needed my card to be flat so I just used a tape runner. I also added some Wink of Stella to my snow bank behind my little fella and the snowflakes. You can't see in the pictures very well but they are really sparkly!

I stamped a "hello friend" saying in a 3/4 inch circle punch, inked the edges blue and added a little bling" to make it shine! I popped that in the center of the large snowflake and attached it behind the snowman's head. You can stamp any greeting to customize your card. (Happy Birthday, Thinking of You, Think Snow to name a few.) I even added some "bling" to the centers of my snowflakes. You can add as much or as little "bling" as you like. Make it your own creation by adding more embellishments. Puffy paint for snow is fun. How about adding some Stickles to the snowflakes?

That's it! See, I told you it was FAST!

Click here to follow my blog with Bloglovin.

Tuesday, January 19, 2016

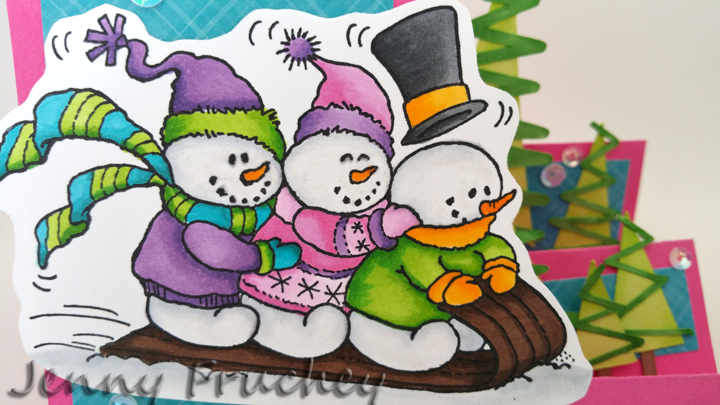
Sledding Fun!


This colorful card will brighten up anyone's day! I have a sentiment for Christmas but you can add "Let It Snow" to the bottom for a fun, winter "pick me up" card!

I stamped the playful snowman image from Stampendous Impressions on Copic friendly paper.  (Not sure of the name but the code was CRP234. If you can't find this exact stamp set, use another snowman image.)  My paper was Neenah solar white cardstock and I used Memento Tuxedo Black ink which is also Copic friendly. Stamp your image and color it. Cut the design out leaving a small border around the image.


For the card base there are several options. I used a Sizzix die for my base and background papers. You can also use a Silhouette cut file from Lori Whitlock. Both options will give you the same result. Cut out a base in desired color using cardstock. Then cut liner papers that coordinate with your base paper. I used pink cardstock and a bright blue for my base papers. Scrap paper works great for these pieces! Attach papers to base after they are cut out and add your main image to front of card as shown.


To add interest to the side, I cut out some triangle scribble trees in various sizes from the Silhouette Design Store. They vary in size from 1 inch to 3.5 inches tall. (Including stumps)
Add the trees to the side steps in a staggering fashion. I used some dimensional foam squares to pop up some of the trees to add some extra dimension.


Cut a sentiment out of cardstock using your die cutting machine and your favorite font or use a die. I used "Merry Christmas" die from Lawn Fawn. Like I said above, if you want to use this as a winter card you can use "Let It Snow" from Lawn Fawn or any other sentiment you would like. You could even stamp one! This would make a great birthday card also by using "Happy Birthday" by Lawn Fawn. I love Lawn Fawns dies! (as if you couldn't tell....)

You could be done at this point or go the extra mile, like I did, and add some sequins!

STAY WARM MY FRIENDS!!