Showing posts with label Paper Crafting World. Show all posts

Monday, January 25, 2016

Snow Fun Side Step Card

Hi! I'm here to make a fast and most importantly adorable snowman card!


I used the snowman from Snow Fun Layout at Paper Crafting World to make this side step card. Let's get started!

Cut out the snowman from the Snow Fun Layout set  at the size it opens up in your program. It is a little over 5 inches assembled. Use any colors you would like for your little man. I used purples for his scarf and hat. My papers are all from Recollections. (To add more interest use patterned papers!) Next, cut 4 snowflakes from the same file. Cut one a bit larger than the others for the message.

For the side step card: I used a Sizzix die but you can also use a silhouette design or even free hand one. Use paper that coordinates with your snowman's hat and scarf.


After you have all your pieces cut it is time to ink the edges. This is not mandatory but it does add more depth to the card. I used Dew Drop inks and a sponge dauber to ink around the edges of my pieces for my snowman. I used some light pink on his cheeks to make him blush. You can also do the snowflakes if you would like. Just be careful the sponging may bend the fragile cuts.

Now time to assemble the snowman. If you aren't mailing the card you could use dimensional squares to pop out his features. I needed my card to be flat so I just used a tape runner. I also added some Wink of Stella to my snow bank behind my little fella and the snowflakes. You can't see in the pictures very well but they are really sparkly!

I stamped a "hello friend" saying in a 3/4 inch circle punch, inked the edges blue and added a little bling" to make it shine! I popped that in the center of the large snowflake and attached it behind the snowman's head. You can stamp any greeting to customize your card. (Happy Birthday, Thinking of You, Think Snow to name a few.) I even added some "bling" to the centers of my snowflakes. You can add as much or as little "bling" as you like. Make it your own creation by adding more embellishments. Puffy paint for snow is fun. How about adding some Stickles to the snowflakes?

That's it! See, I told you it was FAST!

Click here to follow my blog with Bloglovin.

Monday, January 11, 2016

CHEERS!

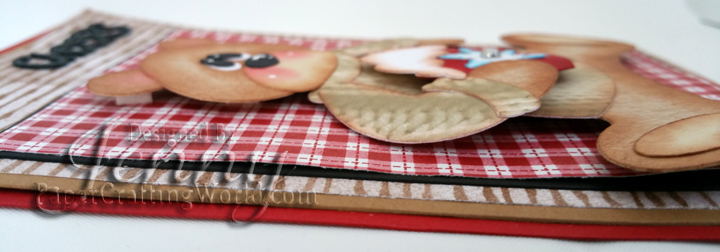
Today's sweet bear is a cut file from Paper Crafting World, Bear Holding Hot Chocolate. He is a very easy file to cut out and assemble. It is a great card for a winter birthday or just a wintery hello!

 
 Let's make the card!

1. Open the file and adjust the bear to measure 4.25 inches. My card is 4.5 x 6.5. It fits into an A7 envelope without any extra shipping.
2. Cut the bear pieces out in desired colors.
3. Shade each cut piece with ink. I used Memento Dew Drops.


4. Assemble the bear. I used dimensional glue dots on the cup. Add some dots of white paint to check and eyes for high lights. I also added a rhinestone to the snowflake for some added bling.


5. For the papers: Red base is 4 1/2 x 6 1/2; Brown 4 1/4 x 6 1/4; Decorative Brown Stripe 4 x 6;
 Black 3 5/16 th x 4 13/16 th; Decorative Red Plaid 4 1/4 x 6 1/4.
6. Layer all the papers and adhere with tape and use dimensional pads to pop the bear up off the mat.
7. For the word, "cheers" I use the Sizzix Thinklits Drop-Ins.  I cut off the word HOLIDAY and just used CHEERS. Attach it to the top right of your card.
8. You can use anything to decorate your card front. I used some faux enamel dots I made from melting some Perler beads.


Monday, December 21, 2015

Paper Crafting World's Elf on a Shelf

My elf came off the shelf and is just popping in to say, Merry Christmas! I used the Paper Crafting World's Elf on the Shelf Boy Cut File, for this easy Christmas card. I know it is almost Christmas but this is easy enough to make in a rush.


I cut him out, inked the edges with Dew Drops ink pads and assembled him. I cut a circle with a sizzix scallop circle die and layered that over red dot scrapbook paper. I added that over a plaid piece of scrapbook paper and adhered it to a red A2 card.


To finish the card off, add embellishments you have in your stash. I had some red faux enamel dots I used as berries (I also used a yellow dot for a button) and hand cut some green paper for some holly leaves. I added them in the corners and a baby bow under the banner. The baby bow is from Paper Smooches. If you don't have a bow die, use ribbon to tie a bow and glue on with glue dots, add a banner stamped with your favorite holiday greeting and you are done! (You can use a die to cut the banner, a cut file of a banner or free hand one.)


I hope you enjoyed this easy Christmas card. I want to wish you all a Merry Christmas and hope you check back in the new year for more fun and easy projects!

Monday, December 7, 2015

Do you want to build a snowman??


Let's make a pop up card!!


This adorable little girl and her snowman friend are files from Paper Crafting World's
Frosty Fashionista.


Take an 8.5 x 11 inch piece of blue paper. Cut it to 4.25 x 11 inch. Score 5.5 inches down to make a vertical top fold card. With the right side of the paper we will make the base.  Cut the base to Score (a) .38 inch from the bottom
and (b) .38 up from that score. Then turn the paper over and score (c)
at .38 from other side.


(I did a sample of what it should look like. This should be done with your blue paper not orange. I used this as an example.)

Next fold on the score lines. A a valley fold, B mountain fold and C mountain fold. See below for folds and placement.


Now cut out the little girl and snowman from frosty fashionista. (Do not cut any images larger then 3.75 inches tall so they don't peek out of the card when it is closed.) Cut out some clouds and a sun either with a die, free hand or use this adorable set called, Apple-Tree-Clouds-Sun-Grass.  Ink all the edges with coordinating Distress Inks. Free hand some snow banks and ink them with a light blue ink. Add clouds and sun to the background of the card. Add some snowbanks. Decide where you would like the little girl to stand and where you would like the snowman to be. (Check before you cut anything that the images are placed far enough back so they don't stick out when the card is closed.) Then cut a slit in the floating floor with an X-ACTO knife.  Cut a strip of paper for a support and fold it at the end to secure to the bottom of the card through the hole you created.  Adhere the girl to the support. Do the same for the snowman. Add snowbanks to the front or back of their feet so they will move with the card. For added support, make another strip and fold on each end and adhere to background and back of girl and snowman's heads. Fold the card and train all your folds to lay flat. For some added bling I cut some snowflakes out of some glitter wrapping paper and glued to the bottom of my floating floor.


For the front of the card: You can decorate any way you would like. I added some decorative paper to the bottom of the card. Used some green paper to make a strip of paper to go above the patterned paper and die cut some words on my die cutting machine. I used glittered wrapping paper for all the shiny stuff, even for the faux ribbon across the card. Lastly I rounded the bottom corners of the card with my corner chomper.


If you would like to turn it into a Christmas card, add a Christmas tree to the background with some presents or have the little girl holding a gift.


Monday, November 23, 2015

Gingerbread Easel Card


Making an easel card is fun and easy! I used the adorable gingerbread people from the All Baked Out set over at Paper Crafting World. There are a lot of cute files included in this collection. I used the single man and woman. You can easily use the other designs such as the border people or the title on the base of this card.

Let's make a card!!


I used a die for the base of my card. It is from Sizzix. You can use any stand up bases you like. Silhouette has many in the design store and you can always cut one by hand too. Once you have your base cut from red card stock, decorate it with some patterned paper. I use Christmas papers from Recollections Sugar Plum pad. It was sold by Michael's a few years back but any papers will do.

Cut a white piece of card stock and stamp a greeting. I used a stamp from my stash. I used Stazon black ink and then antiqued the edges of the cut shape with some tea dye Distress Ink.

Cut the cute gingerbread people out your die cut machine. I used my Silhouette Cameo. I inked all the pieces with Distress Inks that matched my papers. I used all solid papers for these cuties. Assemble the folks. Decorate them if you would like with 3D elements to add interest. I added buttons made from melted Perler beads.


I cut the candies out from red and white card stock. I used a red permanent marker to add some extra lines to match my candy paper, this is optional. Add some Glossy Accents to the candy die cuts to add dimension. Let them dry before you attach them. I also added a dot of white acrylic paint with a tooth pick to their cheeks to finish off their faces.

As for the bottom "joyful" embellishment. I used a die from Sizzix. I cut it out three times and glued them together for dimension.


Glue on all your embellishments and you are done!! This card can be folded flat to mail and propped up to display!!


Tuesday, November 10, 2015

Turkey Time!


An adorable turkey from Paper Crafting World is the headliner to this card.  Once you cut the turkey, ink the pieces with Distress inks, the rest of the card goes together quickly. It is an A2 card meaning it is 4.25 by 5.5 inches. The striped paper is cut .13 inch smaller to leave an edge around it. (I used a rust paper for my card base. You could use white paper and add a 4.25 by 5.5 inch piece of paper over the front of your white card base and continue as instructed. This way, the inside of your card is white.) Cut some tan paper 3.5 by 5.5 inch and run it through an embossing folder. Any embossing folder will work. This procedure adds texture and interest to your card. (Round the corners with a corner chomper if desired.)  Add black paper behind that piece with .13 inch showing to make your image pop off the page. (Round corners if you rounded the other rectangle.) Add ribbon that matches your papers and then the turkey on top to finish off this element. 


The top rectangle is 2.75 by 3.5. (I used decorative paper with words. You can use any coordinating paper.) Cut a .13 inch paper border to go behind it. Add it to the top of the card, add the other embellished rectangle and you are done! (For some added fun you can add some faux enamel dots.)


Happy Thanksgiving!!

Wednesday, October 7, 2015

Scarecrow Card

I made this adorable scarecrow card from a Paper Crafting World design. It was originally a treat box but I wanted to show you how versatile the files are. It's like buying a treat box and getting the card file for free!


Let's make the card!

Open the Scarecrow boy treat box cut file in your die cutting program. I used my Silhouette Cameo.
Move the whole file off to the side of your cutting mat and ungroup. Select only the scarecrow pieces and place them on your mat.To size the scarecrow you need to assemble the pieces, use the "select all" button to select the whole scarecrow and size to 5.25 inches.


Next to make a card body you need to keep the design in one piece and use the shadow button and make a shadow .25 inches around the outside of your scarecrow. (If you want a white card base, keep a copy of this black shadow and then make the card base as described but make it white and add the black shadow to the white card base.)


Drag this shadow piece to the side and make a copy. Select the copy and flip that image vertically. Now merge the new flipped image with the original shadow copy and weld together at the hat. This completes the card base that the scarecrow will be built on. Move the card base to the right of the mat so you can work on the scarecrow body.


Take all the scarecrow pieces and group them according to color on your mat. You can place the black eye pupils next to the card base so you can cut together. (If you made a white card base then add the pupils to the copy of the black shadow piece.) I cut the shirt out of decorative paper but you can use solid paper if you don't have decorative paper.


Add your colored paper to your mat and cut out all the pieces. Ink around all your die cut pieces. I used Distress Inks. Prisma colored pencils were used to add details to my pieces. Add cheeks using chalk or Distress ink. Use a Zig Millennium .01 to draw on eye lashes and faux stitches around all the scarecrow features. Assemble all pieces on black card base. (Or black shadow base.) I used tiny brass brads for the pocket details and white enamel dots for the overalls buttons.
All Done!

Not seen on the directions:
I added a pumpkin! October's Challenge over at Paper Crafting World is "Anything Goes" and the "Twist" is to use a pumpkin!

Tuesday, September 29, 2015

Carmelita


Meet Carmelita! She is a file from Paper Crafting World or PCW. She is the second file in the Chico and Carmelita set. My last project from PCW was Chico and this adorable female Chihuahua is Carmelita.

Here's how to make the card!

1. Open up your Silhouette program and purchase design 42687 from Lori Whitlock. Cut out your card in red. The card opens up the size you need so don't adjust anything. Add paper to your mat and cut out the base card only.
 
2. Change the paper on the mat to your favorite dog paper for the background. Mine was from Creative Imaginations by Samantha Walker. I welded the square base to the bottom border to make one solid background for the front of the card. Don't forget to make the top 1/8 inch larger to replace the over lapping weld. See below:
 
 
 3. Make sure you also cut out the two side panels if you want them to match your base paper. If not, change out your paper and cut side panels.
 
4. Set that aside for now. On to the dog. Arrange all the pieces of Carmelita on your mat and assemble the dog in your program. Over lap where you would normally glue. Then select the whole image and size the dog to 4.5 inches, this includes the top of her ears. Select the whole dog and make a 1/8 inch shadow around her and cut out of black.
 
5. Disassemble the dog and place each puppy part in groups by color. Cut out the puppy parts with the colors you would like her to be. Ink the edges of all the cut pieces with Distress Inks. Use inks that are a shade darker then the paper you used to shadow.
 
 
6. Assemble the dog and add any details you would like to embellish. I used a rhinestone on the collar and some Wink of Stella on the bow and flower charm on the collar.
 
7. Add base papers to card and pop up Carmelita with foam squares. I added some extra embellishments on my card with stickers from Karen Foster Design Love my Dog #10475 and Sandy Lion stickers Dog Phrase.


Monday, September 7, 2015

Paper Crafting World Design Team

I'm so excited to announce that I have been selected to serve on Paper Crafting World's design team! Over the next 6 months I will be designing exciting projects featuring designs from Paper Crafting World! Check out their web store for fun SVG files and other cut files to use with home die cutting machines! They also have a great blog you can follow where other design team members and I will be making awesome projects with Paper Crafting World's (PCW) adorable cut files!


So to help celebrate the new design team, PCW is having a special! Just use the code PCW55 at the checkout and you will get 55% off your entire purchase with no minimum! This special offer will close on September 18, 2015.


Follow my blog with Bloglovin