Showing posts with label snow. Show all posts

Thursday, July 27, 2017

Crafter's Companion and HSN

Crafter's Companion is on HSN Wednesday, August 16, 2017. Come join the WATCH PARTY on Facebook. There are prizes, sneak peeks and tons of inspiration on what you will be seeing on HSN!

Here is my contribution to the "sneak peek".......


How about a close up of the shaker??


Come on over to the Crafter's Companion Facebook page for more projects like this!!


Happy Crafting!!
Jen


Friday, February 26, 2016

Guest Designer for Miss Kate Cuttables

This is Jenny Fruchey from Jen's Crafty Place. I am very honored to be the Miss Kate Cuttables Guest Designer for today!

I don't know about you but anything Rudolph brings back such wonderful childhood memories for me. Since Christmas is over, I have a great winter card for you! Snow Yeti is that wonderful Abominable Snowman from Rudolph. It is a great addition to scrapbook pages or cards but I decided to make HIM my actual CARD. If you don't know how, just follow along!
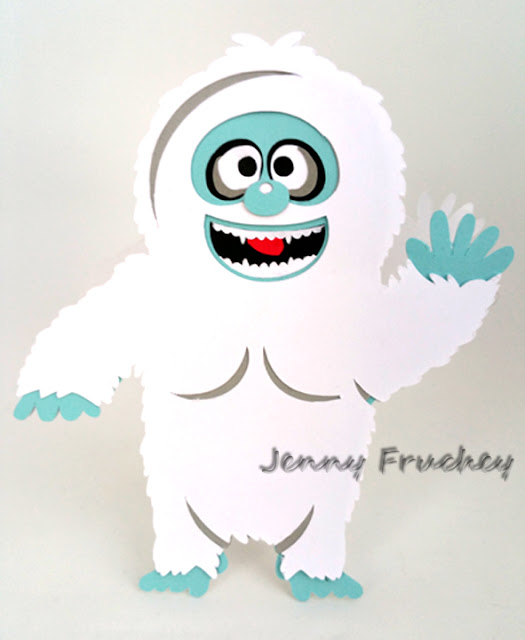
 
 
1. Open the file in your favorite cutting software. I used my Silhouette Cameo and Make The Cut.


2. Select the WHOLE file and pull the bottom right handle to size the yeti to 5.25 inches.


3. Select the solid yeti. In the pic above it is the green image. Move all items off the cutting mat and move the green yeti on the mat. Select "copy" and "paste in place" then "flip". Without moving it, use your "up arrow" on your key board to move the new copy of your yeti up until just the top is overlapping with your original yeti.


4. Select the two yetis and use the "weld" key to weld both snowmen together to form the base of your card.

 
5. Cut the card base out with white card stock and cut all other pieces out in their respective colors. (One light blue, one grey and one white.) The Yeti file is color coordinated but if you need some reference use the jpg included in your file purchase. (You do not need to cut out the Christmas trees or the snowflakes for this project.) I grouped each item by color so you can cut them out at the same time. Either arrange each color group on a mat and cut or arrange each group on a section of the mat and cut all together.
 
 
6. Add some black paper behind the light blue face. (The holes for the mouth and eyes.)
7. Glue all layers together. Start with the white base, add the light blue layer with the black added to the back, next the grey layer and last the white.
8. Add the eyes, nose, teeth and tongue and you are DONE!

 
This technique for making the base card can work for all kinds of files. Have fun playing with your images! Use them for more then just embellishments for cards; use them AS your cards! People enjoy getting special shaped cards. Give it a try!


Click here to follow my blog with Bloglovin.

Monday, January 25, 2016

Snow Fun Side Step Card

Hi! I'm here to make a fast and most importantly adorable snowman card!


I used the snowman from Snow Fun Layout at Paper Crafting World to make this side step card. Let's get started!

Cut out the snowman from the Snow Fun Layout set  at the size it opens up in your program. It is a little over 5 inches assembled. Use any colors you would like for your little man. I used purples for his scarf and hat. My papers are all from Recollections. (To add more interest use patterned papers!) Next, cut 4 snowflakes from the same file. Cut one a bit larger than the others for the message.

For the side step card: I used a Sizzix die but you can also use a silhouette design or even free hand one. Use paper that coordinates with your snowman's hat and scarf.


After you have all your pieces cut it is time to ink the edges. This is not mandatory but it does add more depth to the card. I used Dew Drop inks and a sponge dauber to ink around the edges of my pieces for my snowman. I used some light pink on his cheeks to make him blush. You can also do the snowflakes if you would like. Just be careful the sponging may bend the fragile cuts.

Now time to assemble the snowman. If you aren't mailing the card you could use dimensional squares to pop out his features. I needed my card to be flat so I just used a tape runner. I also added some Wink of Stella to my snow bank behind my little fella and the snowflakes. You can't see in the pictures very well but they are really sparkly!

I stamped a "hello friend" saying in a 3/4 inch circle punch, inked the edges blue and added a little bling" to make it shine! I popped that in the center of the large snowflake and attached it behind the snowman's head. You can stamp any greeting to customize your card. (Happy Birthday, Thinking of You, Think Snow to name a few.) I even added some "bling" to the centers of my snowflakes. You can add as much or as little "bling" as you like. Make it your own creation by adding more embellishments. Puffy paint for snow is fun. How about adding some Stickles to the snowflakes?

That's it! See, I told you it was FAST!

Click here to follow my blog with Bloglovin.