Showing posts with label winter. Show all posts

Thursday, December 20, 2018

Miss Kate Cuttable's Spinner Winter Card

HI!! I have a great interactive card today. It is a spinner card! I used some great files from Miss Kate Cuttables.  Before we get into the project, don't forget to get the FREEBIE of the day!!  Now on to the project!!


I used the "Christmas Penguin" file to cut the penguin two times. I flipped the one penguin horizontal. Then I used the Swirl Snowflakes Digi Paper to make a piece of paper to fit the front of my card. I sized it 1/4 inch smaller then my A2 card. My digi paper finished size is 4 x 5.25 inch.


I designed my card all on my Cameo 3 by Silhouette.  I made my penguins about 2.5 inches tall and made my hole circle larger, about 3 inches in diameter so the penguin can spin freely. I placed them all on my digital mat and cut all the images at once.


I laid a piece of clear thread across the hole and taped it very securely with scotch tape. Then I placed the thread between the two penguins and glued them to each other. Lastly, I added the digital paper on top and my card was finished. For the sentiment I used, " Winter Word Titles". 


I didn't like the cut I got with the snowflakes on the sentiment so I had to hand trim them off. I also hand trimmed the white border. I cut the words at a length of 4 inches so the snowflakes were too tiny to have all the details in the snowflakes cut properly. If your cutter is up for the challenge, then leave them on. It is your choice!! I also added some Wink of Stella to the letters for a glistening effect. I used foam adhesive to pop up the sentiment when I was finished.


To use the card, you spin the penguin over and over like 30 or 40 times and then shut the card and place it in the envelope. When the recipient opens the card, the little penguin will spin wildly in the opening!! It is great fun for children (and I enjoy a spinner card, truth be told!!).


That is all I have for today! Thanks for joining me and don't forget to sign up for my newsletter!

Friday, November 2, 2018

Snowy Greetings from Joy Clair Stamps

"It's the Season" over at Joy Clair Stamps!! Join us for a fun Hop with all the Designers using our holiday stamps for lots of great ideas for the Holidays!

I love the "Snowy Greetings" stamp set from Joy Clair Stamps. It has a lot of fun sayings and cute images to boot!


To make this card I started out with some blue card stock and splattered it with some watered down acrylic paint. I loaded an old tooth brush and ran my thumb down the bristles to make a tiny spray of "snow".


 Next, I stamped some of the snowflakes from the set with some Versamark and used some white embossing powder to set them off. I heated it with my heat gun and moved on to my next step.


I stamped the snowmen on copic friendly paper with some Memento black ink and colored them in with my copics. I used a tiny bit of sparkly pen when I was finished because I love the shimmer it adds to snow.


I added my snowmen with some adhesive foam dots and stamped, "Let It Snow" with the same black ink and added some ... with a black pen. As usual, I didn't stop there with my "black pen" so I added some outlines around my blue card stock to add some more detail.


I mounted my blue paper onto an A2 card base with foam adhesive and I was finished! Check out the whole release HERE!!

Thank you for joining me today. Don't forget to sign up for my newsletter!!


Thursday, January 18, 2018

You, Me and Penguin make 3!

Hi! Let's make a fun winter card with Miss Kate Cuttables Penguins.

Before we get into my project, be sure to get your FREEBIE OF THE DAY over at Miss Kate Cuttables by clicking here.


Now back to my card, I used the adorable penguin from the Penguin Set.https://www.misskatecuttables.com/products/product/penguin-set-1-2.php
I made both penguins since I was cutting anyway. This way I have one ready to go for my next project! (I also cut two more penguins from Penguins Set 1)

Now on to the Project!


Purchase your files, unzip them and upload them to your favorite cutting program. I used Silhouette Designer Edition for my Cameo 3. I laid out my penguins and sized them to the size I wanted them to be. Mine are 4 inches high. You can make them any size, that is the great thing about digital images. You are not limited to one size like with metal dies. I made a 5x7 inch card so I made him larger then usual. As I stated above I also cut the second set of penguins since the paper colors were all the same, the only thing different on each were their scarves. I then assembled all 4 penguins at the same time so I have them ready to go for my next projects.

For this card I used an old 12x12 paper pad from Michaels. It is made for scrapbooking but lately I am doing more cards then pages so I decided to adapt some of the elements for my card. I picked my papers and then decided to use the word page for my sentiments.  Below is a pic of my scrapbook paper that I cut apart for my card. I like to use all of the pad when I can. These types of pages are hard to scrapbook with but they are great for card making!


I cut out the sayings I wanted to use and backed them on black paper with a tiny border. I also cut my background paper to 5x7 inch (red dot paper) and mounted that on my card base. I cut a 3.25x4 inch paper for the middle box and also backed it with black paper. (blue polka dot paper)
I laid my design out and put the words where I wanted them and went back and glued them down. I used foam dots on my penguin so he stands out a bit. Lastly, I added some Wink of Stella pen to the scarf and white dots with my white gel pen.


I hope you like my card. Give it a try! If you make something with these files, be sure to post them below and share with all of us! Until next time, Happy Crafting!!


Thursday, July 27, 2017

Crafter's Companion and HSN

Crafter's Companion is on HSN Wednesday, August 16, 2017. Come join the WATCH PARTY on Facebook. There are prizes, sneak peeks and tons of inspiration on what you will be seeing on HSN!

Here is my contribution to the "sneak peek".......


How about a close up of the shaker??


Come on over to the Crafter's Companion Facebook page for more projects like this!!


Happy Crafting!!
Jen


Sunday, April 16, 2017

Paper Piecing Fun

This cute little guy is a stamp from Penny Black named "Snowy". There are so many ways to decorate this guy, I am having fun doing some of them. This one is paper pieced. You can color with markers, watercolor with paints, or color with colored pencils. What ever the medium you like to work in, this little guy is fun to do!

I used Doodle Bug paper for the background, scarf and hat paper piecing as well as the gingham paper strip. I did some simple coloring on the body, face and hat with Spectrum Noir alcohol markers from Crafter's Companion. (The markers will be available on HSN Tuesday, May 9, 2017 with a whole bunch of other goodies from Crafter's Companion! Mark your calendars! It will be 24 hours of crafts and crafting items. Be sure to check out the "Today's Special" of wonderful card making dies from Crafter's Companion.)  I also used a Lawn Fawn stitched rectangle for the main image which I popped up on foam adhesive. I added the faux enamel dots, which I made, for my embellishment. For the sentiment I used a Lawn Fawn set called Winter Scripty Sayings.

I hope this gives you some inspiration (if not, you can check out this Pinterest page for more ideas) to get some card making of your own done. (It is never too early to start those Christmas cards!) Be sure to follow to my Pinterest page while you are there! Also subscribe to my blog on the right hand side of  this post to receive updates of my blog in your email!

Thank you and Happy Crafting!


Friday, February 26, 2016

Guest Designer for Miss Kate Cuttables

This is Jenny Fruchey from Jen's Crafty Place. I am very honored to be the Miss Kate Cuttables Guest Designer for today!

I don't know about you but anything Rudolph brings back such wonderful childhood memories for me. Since Christmas is over, I have a great winter card for you! Snow Yeti is that wonderful Abominable Snowman from Rudolph. It is a great addition to scrapbook pages or cards but I decided to make HIM my actual CARD. If you don't know how, just follow along!


1. Open the file in your favorite cutting software. I used my Silhouette Cameo and Make The Cut.


2. Select the WHOLE file and pull the bottom right handle to size the yeti to 5.25 inches.


3. Select the solid yeti. In the pic above it is the green image. Move all items off the cutting mat and move the green yeti on the mat. Select "copy" and "paste in place" then "flip". Without moving it, use your "up arrow" on your key board to move the new copy of your yeti up until just the top is overlapping with your original yeti.


4. Select the two yetis and use the "weld" key to weld both snowmen together to form the base of your card.

 
5. Cut the card base out with white card stock and cut all other pieces out in their respective colors. (One light blue, one grey and one white.) The Yeti file is color coordinated but if you need some reference use the jpg included in your file purchase. (You do not need to cut out the Christmas trees or the snowflakes for this project.) I grouped each item by color so you can cut them out at the same time. Either arrange each color group on a mat and cut or arrange each group on a section of the mat and cut all together.
 
 
6. Add some black paper behind the light blue face. (The holes for the mouth and eyes.)
7. Glue all layers together. Start with the white base, add the light blue layer with the black added to the back, next the grey layer and last the white.
8. Add the eyes, nose, teeth and tongue and you are DONE!

 
This technique for making the base card can work for all kinds of files. Have fun playing with your images! Use them for more then just embellishments for cards; use them AS your cards! People enjoy getting special shaped cards. Give it a try!


Click here to follow my blog with Bloglovin.

Tuesday, January 19, 2016

Art Impressions Snowman Shaker


This cute Snowman Shaker card design is from Art Impressions. The packages and his arms are separate and they "wiggle". They are mounted on an Action Wobble. It is fun watching people's reactions when they receive these cards. They are so interactive and fun!

Let's make the card!

Stamp your snowman image and the arms with packages on some card stock. I used my Copics to color the image so I used Neenah solar white cardstock and Memento Tuxedo Black ink to stamp the image. Memento is Copic friendly as well as the Neenah paper. If you plan on using colored pencils or other color mediums use the correct paper for your medium. Color your image.


Cut out the snowman and the spare arms and set aside for now. Use a paper punch or die and cut out a snowflake. I used my Silhouette Cameo to cut out a 2 inch snowflake and paper punch for the 3/4 inch circle. I stamped "be merry" from a stamp set and inked the edges with light blue ink. To add some extra sparkle I used some Wink of Stella on the snowflake. Use a dimensional foam square to attach the circle to the snowflake.

The card base is one I use over and over. It is the Sizzix Framelits Kind Sentiments Step Up Card set. Not only does it have the base die but they also have dies for the side and base papers already sized to fit exactly on your project. No more measuring for that perfect quarter inch border! I love the fact that I can use scrap papers for these cards because I can position the die over my scrap and make sure there is enough paper before I cut. Let's face it, we all love to use up our scraps so we don't have to bust into a whole piece of paper from our stashes! (Yes, I am a paper hoarder!)

Pick your papers and cut out a base with cardstock. You can use decorative papers for the side and base layers. There are even fun dies included in the Framelits set that will do some fancy cutting to the side panels, no paper required. I choose some polka dot papers I had left over from a previous project and some blue scrap that I used for the background of the main image.


Attach your snowman to the base. Attach your wobble to the back of the arms and then adhere to snowman. If you attach the wobble to the base first you may see it peeking out from behind the arms. (It is best to attach to the back of the arms so you can position it where it won't show.)

Now it is time to attach the snowflake to the bottom left of the snowman. At this point you can be done but to add a little more interest I added some button snowflakes I had in my stash. If you don't have any buttons shaped like snowflakes you could add some snowflake punches or some sequins.


Monday, January 11, 2016

CHEERS!

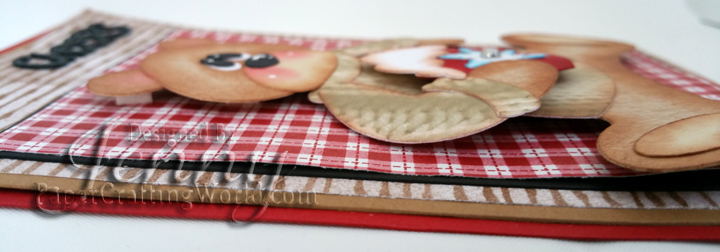
Today's sweet bear is a cut file from Paper Crafting World, Bear Holding Hot Chocolate. He is a very easy file to cut out and assemble. It is a great card for a winter birthday or just a wintery hello!

 
 Let's make the card!

1. Open the file and adjust the bear to measure 4.25 inches. My card is 4.5 x 6.5. It fits into an A7 envelope without any extra shipping.
2. Cut the bear pieces out in desired colors.
3. Shade each cut piece with ink. I used Memento Dew Drops.


4. Assemble the bear. I used dimensional glue dots on the cup. Add some dots of white paint to check and eyes for high lights. I also added a rhinestone to the snowflake for some added bling.


5. For the papers: Red base is 4 1/2 x 6 1/2; Brown 4 1/4 x 6 1/4; Decorative Brown Stripe 4 x 6;
 Black 3 5/16 th x 4 13/16 th; Decorative Red Plaid 4 1/4 x 6 1/4.
6. Layer all the papers and adhere with tape and use dimensional pads to pop the bear up off the mat.
7. For the word, "cheers" I use the Sizzix Thinklits Drop-Ins.  I cut off the word HOLIDAY and just used CHEERS. Attach it to the top right of your card.
8. You can use anything to decorate your card front. I used some faux enamel dots I made from melting some Perler beads.


Monday, December 7, 2015

Do you want to build a snowman??


Let's make a pop up card!!


This adorable little girl and her snowman friend are files from Paper Crafting World's
Frosty Fashionista.


Take an 8.5 x 11 inch piece of blue paper. Cut it to 4.25 x 11 inch. Score 5.5 inches down to make a vertical top fold card. With the right side of the paper we will make the base.  Cut the base to Score (a) .38 inch from the bottom
and (b) .38 up from that score. Then turn the paper over and score (c)
at .38 from other side.


(I did a sample of what it should look like. This should be done with your blue paper not orange. I used this as an example.)

Next fold on the score lines. A a valley fold, B mountain fold and C mountain fold. See below for folds and placement.


Now cut out the little girl and snowman from frosty fashionista. (Do not cut any images larger then 3.75 inches tall so they don't peek out of the card when it is closed.) Cut out some clouds and a sun either with a die, free hand or use this adorable set called, Apple-Tree-Clouds-Sun-Grass.  Ink all the edges with coordinating Distress Inks. Free hand some snow banks and ink them with a light blue ink. Add clouds and sun to the background of the card. Add some snowbanks. Decide where you would like the little girl to stand and where you would like the snowman to be. (Check before you cut anything that the images are placed far enough back so they don't stick out when the card is closed.) Then cut a slit in the floating floor with an X-ACTO knife.  Cut a strip of paper for a support and fold it at the end to secure to the bottom of the card through the hole you created.  Adhere the girl to the support. Do the same for the snowman. Add snowbanks to the front or back of their feet so they will move with the card. For added support, make another strip and fold on each end and adhere to background and back of girl and snowman's heads. Fold the card and train all your folds to lay flat. For some added bling I cut some snowflakes out of some glitter wrapping paper and glued to the bottom of my floating floor.


For the front of the card: You can decorate any way you would like. I added some decorative paper to the bottom of the card. Used some green paper to make a strip of paper to go above the patterned paper and die cut some words on my die cutting machine. I used glittered wrapping paper for all the shiny stuff, even for the faux ribbon across the card. Lastly I rounded the bottom corners of the card with my corner chomper.


If you would like to turn it into a Christmas card, add a Christmas tree to the background with some presents or have the little girl holding a gift.