Friday, May 25, 2018

Coffee Loving Cardmakers and Me

Today I am doing a blog hop with Joy Clair and Coffee Loving Cardmakers Blog. The challenge was make a card using a coffee theme and also make it a spring/summer theme.

http://coffeelovingcardmakers.com/6523
This is my card for this hop. I hope you like it!


I used some decorative paper for the cups and the tablecloth background from a old paper pad from K and Company called, "Sweet Nectar". The doilies were cut from scrap white card stock I had on hand and a doily die. I used three stamp sets from Joy Clair called, "Christmas Cocoa",  "Hello Sentiments", and "New Baby". I used the cup from "Christmas Cocoa" and the sentiment was from "Hello Sentiments" and the heart on the cup was from "New Baby".
I added a little glitz with a sparkle pen on the heart and I was done!


If you would like to see Joy Clair's other coffee/tea/cocoa stamp sets, check out this link!


I hope you like my take on the challenge and you have time to look around my blog for more fun cards and inspiration. Don't forget to sign up for my newsletters so you don't miss any posts in the future.

Happy Crafting from Jen!


Thursday, May 24, 2018

Miss Kate Cuttables Flower Cut Cards

Today is a fun and easy project from Miss Kate Cuttables and me! I used a great technique which can be used on any design. I used it on some flowers.

Before we get started on the project, don't forget to get your DAILY FREEBIE over at Miss Kate Cuttables!


I took the file, "Daisy Flower Flourishes" I opened it up in my Silhouette program. I ungrouped the flowers and took the daisy with the red center and placed it on my mat. I sized the flower to the size I wanted and removed the area where the red center was. I then used my "slice" tool and cut away all the bottoms of the petals so all that was left was arches in the form of a flower. I then selected it all and grouped them. Save this file. Next take a rectangle file for your card front and arrange the new cut file you made where ever you want to cut the daisies. I made some of them large and some small. You can arrange them any way you would like, in a row, in a circle, all over or just one large daisy.

This is a fun way to make cut files and use your files a bit differently then just cutting the file as is.


After I got all my card fronts cut, I lifted up the petals by bending at the base. Make sure you do good, clean cuts. Double cuts are a good idea to make your bending easier.

Now all you have to do is add some scrap papers behind the cuts and mount onto a card base. I decided to cut my card front a bit smaller to add some interest. I added buttons, faux enamel dots and jelly dots to my cards. You can add anything you would like to the centers. Other ideas are: dimensional paint, puff paints, beads, pearls, brads, eyelets, enamel paints, cardstock punches or just color the centers with markers!


I hope you enjoy my technique and try it for yourself!! Until next time, Happy Crafting!!


Wednesday, May 23, 2018

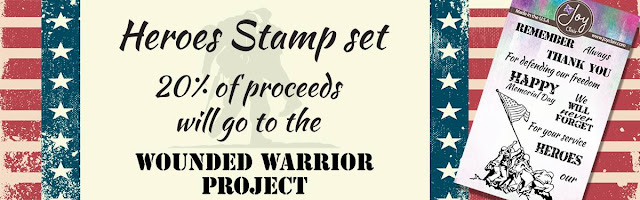
Joy Clair Memorial Day Sale!

 Now is a great time to stock up on some stamp sets from Joy Clair!

https://www.joyclair.com/?aff=31

Not only will you save 20% off your total order you will also be helping out the Wounded Warrior Project if you purchase the Heroes Stamp set.


https://www.joyclair.com/collections/new-arrivals/products/heroes-clear-stamps?aff=31

Thanks for checking in and Happy Memorial Day to you and your family!!

Jen


Monday, May 21, 2018

A Manly Card with Joy Clair's Classic Father's Day Stamp Set

Joy Clair has come out with 12 new stamps sets! Check out all the great stamps HERE!!

Today I will be using a few stamp sets to make my card. I made a manly card and love how it turned out! These stamps are awesome for making men cards which we all know are very hard to do.


I started with a card base that is A2 or 4.25 x 5.5 inch. I covered it with some striped patterned paper.
I then cut my image paper to 4.25 x 3 inches. I stamped the car image from the new set: Classic Father's Day with VersaFine Clair Nocturne. I colored the image with Leisure Arts Premium Colored Pencils. Then I stamped the same car image on some sticky paper and cut it out. I used this "mask" to cover my stamped and colored car and began to stamp the background. I used the new: Joy Clair Crackle Background with some light beige ink to stamp right over the masked card. I then re-inked the same Crackle Background stamp and turned it upside down and re-stamped with a darker brown ink. I then used a sponge to sponge some of the dark ink around the edges of that same panel to make it look a bit more aged.


To add some dimension I also added some Glossy Accents over the car to make it shinny and raised.


When it dried I layered it with some black and red cardstock and added a few die cuts and the front of my card was done! On to the inside....


I used 2 different Joy Clair Stamp sets to do my sentiment. I decided to make it a Father's Day card but you can make it a birthday card, retirement or just because card by changing the sentiment. I used  "Many Names and Classic Father's Day" to piece together my fun sentiment. I used my Versafine Clair Nocturne for this stamping also.

 That's it for now! Happy Crafting!!


Thursday, May 17, 2018

A Playful Card with Joy Clair Stamps

Today is a playful card using the new Joy Clair stamp sets: Life's A Breeze.

Kite5

Start by picking some fun pattern paper. I used a yellow plaid and a fun colored square paper. I stamped the large basic kite on the papers with some VersaFine Clair Nocturne ink. I cut out the kites by hand. I also stamped the kite ties on each paper, stamping 3 of each and cutting them out also. I set them aside until my card base was made.

Kite1

I also stamped the sun from the set on some yellow paper and cut out just the center. Next, I started on my background. I cut a piece of light blue cardstock measuring 5.25 x 4 inches. I stamped my sentiment, "ENJOY YOUR DAY" from the set with VersaMark and used some Imagine Embossing Powder  in white to heat emboss. I stamped my sun stamp in the top left with the same VersaFine Clair ink and then ran the whole thing through my Sizzix with an embossing folder that had clouds on it. This is called "dry embossing".

I then cut a yellow mat 1/8 inch larger then my blue embossed panel. I rounded the corners on all my panels including the A2 card base I am using for my card base. I glued down the yellow panel but popped up the blue panel with some foam tape.

I then arranged my kites and adhered them with foam tape also as well as the yellow sun circle with the foam tape over the stamped sun on the blue panel. I added some twine for my kite tails and glued the kite ties to the twine. If you want to have the strings stay in some kind of placement, use some dots of glue to attach the strings. I tucked my strings under the blue panel with glue also
.
Kite5

At this point you are finished and ready to send your card to someone special to brighten their day!
Thanks for joining me!


Wednesday, May 16, 2018

Father's Day with Joy Clair

Today I have a double project for you! I have made TWO Father's day cards using Joy Clair Stamps. 

Check out all the great Father's Day ideas from Joy Clair's design team HERE!

This first card I made using a few new stamp sets:  Light House, Classic Father's Day and Life's A Breeze.


I began with my card base. I used a die to cut this flip card. I stamped my boat on the square flip with VersaFine Clair black ink and colored it with Leisure Arts Premium Colored Pencils I then blended it out with some Gamsol and some paper stumps. I cut some patterned paper with the card dies accessory dies and attached them to the card base.


I stamped the "Happy Father's Day" sentiment with black VersaFine Clair ink and added some faux enamel dots.  Lastly, I added some details on the art part of the card with some white gel pen and some Glossy Accents. I let it dry and I was done with card number one.


I made another Father's Day card with Joy Clair and their fun sentiment stamp set called, "Hello Sentiments".  I use this set all the time for my sentiments. It covers just about every holiday and also some "just because" holidays.


Since I have 2 Father's to make cards for Father's day I made this tool one. My Father in-law is a handy guy and this card is perfect for him.  I used some tool dies I had on hand. Die cut them with some brown card stock and some silver shinny paper.


I stamped the words "happy Father's Day" with the "Hello Sentiments" stamp set from Joy Clair and black ink using my MISTI to get the words straight.


After I cut out all the tools I arranged them on the stamped card, glued them down and I was done!!


I hope you like my versions of  Father's Day cards! I think they came out so cool!
Happy Crafting!


Friday, May 11, 2018

Coffee Loving Cardmakers with Happy Thoughts


Joy Clair and Coffee Loving Cardmakers have teamed up to do some fun projects! I have to admit I am not a coffee drinker but I do have a fun collection of cups for hot cocoa and tea cards. This card can be for coffee lovers or non coffee drinkers. It is a fun card to send happy thoughts to someone you care about.o


I used three stamp sets from Joy Clair called, "Christmas Cocoa", "New Baby" and "Hello Sentiments". I started out with a craft cardstock for my card base. I cut out a doily with some scrap white cardstock and added it to the card front. I stamped the "SENDING" with some Versafine ink and stamped the red hearts with some red Archival ink. Next, I stamped the image of the mug on some decorative cardstock and used some Copics to color the shadows and the coffee inside the mug. I stamped the sentiment, "happy thoughts" and the heart on the mug and cut it out and popped it up on some dimensional tape. Lastly, I added some dimensional paint on the mug to make the heart 3D.


Thanks for stopping by! I hope you have some time to check out more posts on my blog and sign up for my newsletters so you don't miss any future posts!


Blog Hop Participants!