Wednesday, August 29, 2018

Anniversary Stamp Showcase with Joy Clair and Party Animal

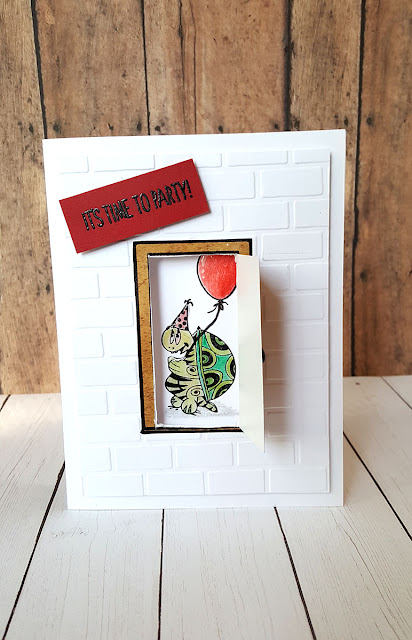
Today's post is about Joy Clair's Anniversary!! Happy 4th Anniversary Joy Clair Stamps!! To celebrate, they have a new stamp set released for this celebration, "Party Animal". It is such a fun set and I had fun making this card for the occasion.


I first stamped the door from, "I Am" on to some wood patterned paper. I used some black StazOn. I cut out the door and set it aside. Next I ran some white card stock through my Sizzix with a brick embossing folder and trimmed it down. I then took a regular A2 card base and got to work on making the door work.


I set the door in the center of my brick paper and traced the inside of the door with a pencil. Then I placed it where I wanted it on my card base. I used a straight edge to cut out my pencil lines going though both layers of the A2 card base and the brick paper. Next, I traced, with a pencil, the door opening to the back page of my card base so I knew where to stamp my image. I used the turtle from the, "Party Animal" Anniversary Stamp Set Release. (You can use any image you would like.) I stamped him with black StazOn and colored him with Leisure Arts Premium Colored Pencils. I then stamped the balloon and drew a string with a black marker.


I also stamped the sentiment from the same set.  To add some more fun, I used a set called, "Doodle Lines" to add the 3 dots after the word, "Happy Birthday" and the arrows on the opposite side of the card.


Back to the card front. I adhered the brick paper with foam dots, making sure to line up the door hole with the one on the card base. Then, glued the door over that opening too.


Lastly, I stamped the, "It's Time To Party" with some VersaMark on some red paper and used some black embossing powder, heated with my heat tool and cut it out. Added it to the front of the card with some foam adhesive and I was finished.


I did decide to add some glossy accents over my turtle and balloon to make him shinny and a bit 3D.


I hope you like my fun "Party Animal" card!!  Don't forget to subscribe to my email and check out the other designers cards!!

Happy Card Making!!


Sunday, August 26, 2018

Joy Clair's New Release "Good Vibes" and a JEEP!!

I am so excited about this new stamp set from Joy Clair's new release. It is called, "Good Vibes".  It happens to have a cool jeep in it and we happen to have a jeep!  My husband will be getting lots of cards made with this set!

 
The card I made today is a great inspiration card for male (or female) especially one who may own a jeep.

 
I used some wonderful Rinea foil on this card for the jeep as well as the embellishments.


I stamped the jeep on the Rinea foil and black StazOn ink. I let it dry. Next, I used a cotton swab to put some Ghost Ink on the headlights and the front window to resemble a glass reflection. ( Let it set for about a minute and then rub it off with a tissue.)  It is so neat to reveal some of the silver under the gold! Cut out the jeep with scissors, carefully.


Next, I worked on the decorations of my card. I cut some banners from silver and gold Rinea foil. (Actually, it is the same paper, gold is on the back and silver on the front.)Stamped my sentiment, "Life is Good" on the smaller gold banner and heat embossed it with some black embossing powder. Be careful or you can wrinkle up the foil with the heat tool. I think you can skip the embossing and just use black StazOn ink but I like to play with stuff to come up with new looks. The heat on the foil makes it wrinkle and even bubble. It is a cool thing if you aren't trying to get a crisp, shinny metal look!

 
I used some texture paper for my card front, added the banners in layers with some tape runner. I only put tape on the top so I could bend the banners up a bit to give some dimension. The paper is actually foil over paper so it bends nicely.  I added a silver band to the bottom of the card and added my jeep with some adhesive dots under the left and right part of the jeep leaving the middle tape free so I could bend it a bit for even more dimension.  Lastly, I added the black enamel dots from a bottle and let them dry.  Glue the front to an A2 card base and your jeep card is done!!


 Thanks for stopping by! Don't forget to sign up for my newsletter so you won't miss a single post!!


Thursday, August 23, 2018

Happy 4th Anniversary, Joy Clair Stamps!!!

Happy 4th Anniversary, Joy Clair Stamps!! This is my contribution to the Anniversary Blog Hop!

https://www.joyclair.com/?aff=31

I have a beautiful stamp set called, "Heartfelt Sympathy" from Joy Clair Stamps.  It has beautiful florals and also some wordage that aides you when you yourself can't find the words to say to somebody in their time of sorrow.

Sympathy6

This stamp set is from the new release, you can see the whole release HERE, is one to make your sympathy cards easier. It has beautiful sentiments to help you with the difficult process of what to put in your cards for healing. It also has some floral stamps too!

Sympathy3
 

I decided to use the technique of stamping with VersaMark and embossing with white embossing powder on a craft cardstock. This technique makes your stamping "POP"! I then colored the images with some colored pencils, but you can also use markers or watercolor markers if you like, even chalks look good with this technique! I then stamped my sentiment with some black ink and added a simple faux stitched boarder box.
  Sympathy2

After I was done with the card, I mounted it on a A2 card base and added some sequences for a little shine as well as some glitter pen over the florals.
  Sympathy7

If you want more dimension you can always layer some foam adhesive under the panel before you add to the A2 card base but I did not since I will be mailing this one out and I didn't want the added bulk.
  Sympathy8

 Again, I want to wish Joy Clair Stamps a very Happy Anniversary!!

Pinterest

Thanks for Hopping!! Keep the fun going and HOP on over to the next Blog on the list!!

PRIZES

To celebrate this 4th Anniversary, Joy Clair is giving away a $25 gift certificate to 4 lucky winners! Please leave a comment here and on the Joy Clair Blog by Sunday, August 26th for a chance to win.
TWO winners will be announced on the blog and TWO on our Facebook Page the last day of the month, August 31st, 2018. Good Luck!


Summer Fun with Miss Kate Cuttables

Today I am making a fun summer card for MKC. These cute popsicles are adorable!! The great thing about this file is you get 4 popsicles to choose from!! I only used 2 of them for this project. I saved the other 2 for another one.

Before we get into the project, don't forget to head over to Miss Kate Cuttables for the DAILY FREEBIE! 

On to the project!!


You can find the designs I used HERE. The file is called "Popsicle Set" but if you don't find one you like in this set you can find more popsicles HERE.


I cut out all my popsicles and glued the layers together and then added a layer of crystal effects over the popsicle parts. I set these aside to dry.


I made some simple backgrounds for these cards since I wanted the main focus on the popsicles. The green card is using a simple dot die cut which I cut out of white and layered over some light green cardstock and mounted on an A2 card base.


For the orange popsicle background I used a dotted embossing folder with white paper and mounted it on an orange A2 card base.


I wanted a simple sentiment that would not take away from my popsicle image. I chose a simple "SWEET" word from "Valentine Word Set". After I cut the word out of black I glued it on the card front. For the green card, I added some glitter pen for some shine.


For the orange one I added some crystal effects over the word "Sweet" to do something different. After I added the dried popsicles to my cards I was finished with these two "sweet" cards! I can use them for a: Thinking of you, Birthday, Summer hello, Graduation card, or a Thank you card. This is a great card to add to your stash for when you need a card in a hurry.

Enjoy!


Monday, August 13, 2018

Miss Kate Cuttables Challenge: Anything Goes!!

Hi Everyone!! Ready for a Challenge?? Over at Miss Kate Cuttables Blog, we are having a Challenge!! The theme for this month's challenge is "Anything Goes"! You can make anything you would like and with any of the Miss Kate Cuttable designs.

Before we begin, head on over to Miss Kate Cuttables for today's Freebie!!  


As you can see, I made a doggie treat container!

 
I recycled a plastic container with the attached lid, cleaned it out and decorated it with Miss Kate Cuttable designs: Playing Puppy and I Love My Dog Title.


To begin, open up your favorite software to print from. I used Silhouette for my Cameo 3 but you can use Photoshop, Word or any of your cutting software. Measure your container and adjust your .jps so they will fit properly.


I printed them on some glossy photo paper but you can print on printer paper, cardstock or photo paper. 


Either with scissors or using your Print and Cut from your cutter, cut out your images. I chose to do it by hand. 


Add adhesive to the backs of your cut images. I used my Xyron because I have one but you can use either glue or tape runner.

To add a bit of fun to my container, I used some decorative paper that I ran through the larger Xyron I had. I placed this on one side of my container and then added the smaller image to it. 


Here is the front of the container with the decorative paper and below is the back of the container with the other design without the paper. 


That's it!! Fill it up with treats for your favorite puppy or even with some toys. If you don't have a dog you can always change the images and use the container for anything!! Some ideas would be:
Cookie container, craft supplies, bathroom items like cotton balls, other pet's toys, crayons, beads, yarn, well....you get the idea, be creative and have fun!!

Friday, August 10, 2018

Joy Clair's Dancing Donut Background

I can't wait for you to see the new release from Joy Clair!! I used a few stamps to make today's card.

But first, be sure to sign up for my newsletters for more projects delivered to your inbox!

Better card front

I used a fun new background stamp called, "Dancing Donut Background". It is part of Joy Clair's new release which you can view HERE.

I stamped the background stamp on some card stock and trimmed it down to 4 x 5.25 and colored them with markers. I added some crystal accents over the donuts to add shine and dimension. When that dried, I sewed the card panel to a A2 card base using purple thread and a zig zag stitch.

Tag cu

To add some more shine, I used some Rinea Foiled paper to make a cute matching donut tag embellishment. I used the GHOST INK by Rinea and stamped my Dancing Donut Background on the foil. I waited a few minutes and buffed the metal with a napkin with some alcohol on it until the donuts shined though.


Tag cu

I layered the foil tag on top of a pick tag and sewed that tag on top of my card front. I also added a little bit of glossy accents on top of the main donut on the tag and also colored the donut a bit with some brown to have it stand out.


A bit closer

Now to work on the inside of the card!! I stamped a sentiment from another new set from the new release called, "Sprinkled With Love".  I stamped the words with some Stazon black ink. To bring some unity to my card with outside to inside I added some foil. I layered the larger strip with some pink paper to further the continuity.

Sweet 2


Inside strip cu

After doing the inside of the card, you are finished!!

Card front

I hope you enjoyed my card and hope you join me again soon for more ideas!!


Thursday, August 2, 2018

Blog Hopping with Joy Clair

Today I am "hopping along" with Joy Clair and the new Release. You can view all the new stamp sets HERE.

I chose the new "Sprinkled With Love" set to create 2 cards. One is more manly and the other is more girly, but they can be used for any occasion. (Thinking of you, Birthday, Thank you)


This green one is more manly because I used greens and yellows for the theme. I also used some awesome foil from Rinea. It is very cool double sided foil. I chose the green/gold. I stamped on it with Ghost ink and distressed it using some black ink and the crinkle method. (You can find more inspiration about Rinea foil HERE)


This one uses the same set, "Sprinkled With Love" but also used the adorable smiley face stamp from the new released set, "Life is Sweet". I stamped the smaller donuts onto some regular white cardstock for the base and with some scrap white paper stamped the larger donut from the set and colored it with Leisure Arts Premium Colored Pencils after I stamped the face from "Life is Sweet". I cut it out and added some glossy accents for some shine. I used some black paper for my sentiment and embossed with white embossing powder. I added just a touch of some Rinea foil paper to bring it all together.


 You can see the dimension that the glossy accents adds to it as well as shine! Lastly, I added a small banner to the top corner with the same glossy black paper and some more Rinea foil paper.


After I made the background I adhered it to a black card base and made my embellishments. I stamped the images from "Sprinkled with Love" onto Copic friendly paper and colored them with Copics. Any colors would look great on this card but I stuck with more manly colors like yellows, greens and oranges. To keep the words from sticking out too much, I colored around the sentiment with some G000 of my Copics.  I also added the glossy accents to this donut and I was finished.


Thank you for stopping by! Please sign up for my blog post emails to receive updates when I post new projects!

Blog Hop Participants:

Martha Lucia Gomez
Lindsay Adreon
Andrea McQuain Bjork
Nicole Winslow
Donna Green Idlet
Helen Gullett
Kerry Urbatch
Angie Cimbalo
Jenny Fruchey YOU ARE HERE
Ceal Pritchette
Monica Maiser

Until next time,
Happy Crafting!!