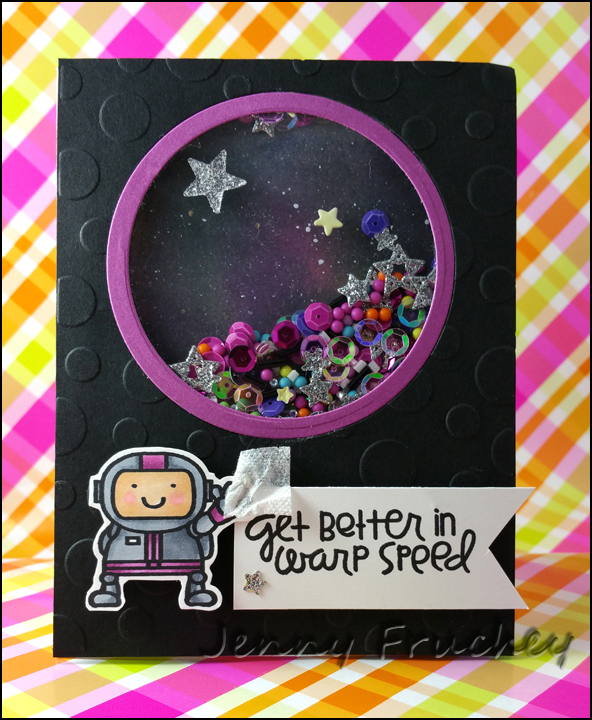
I made the background inside the shaker to look like space. It is an easy technique to do. First cut a piece of white cardstock 4.25 x 5.5 for your base. Then sponge a faux galaxy using any type of stamp pads. I used
Distress Inks (Squeezed Lemonade, Chipped Sapphire, Festive Berries, Black Soot) to sponge in some color and then swirled Black Soot on top of them. Leave some color showing to show depth in the galaxy. Then water down some white acrylic paint and using a stiff brush flick the white paint across the
Distress Ink sky. I also love glitter so I flicked some
Wink of Stella across the galaxy too!
Set that aside to dry and start on the front of the card. Take a 4.25 x 5.5 piece of black cardstock and cut a circle in it with your favorite circle die set. I used
CottageCutz Circle Dies. I used the second and third largest circles. The size isn't important. Just use a circle die you like for your opening. Then use the next smallest circle die in the set and put them both together and cut out a circle to go on the opening of your shaker. I chose a dark fuchsia. (Taping them together before you run though your die cutting machine helps keep them from moving. You want to make sure the smaller circle is centered in the next circle die evenly.)
Let's add some texture to your card front! You can use any embossing folder you have. Again, it is not important to have any certain one. Just use something that has texture. Run your black cardstock through the die cut machine, I am using a
Sizzix Big Kick and a Sizzix embossing folder that is retired. Flip the piece over and run adhesive around the opening. Use a strong adhesive, I used
ATG tape gun. Cut a piece of plastic to go over the opening covering the tape. (I recycle plastic packaging for my shakers. You can also use sheet protectors or plastic overlays. I like to cut my plastic a bit smaller then my card front, then I know it won't come apart and my shaker pieces won't go all over.)
Now let's work on the shaker. (Here is a
video of how to make a basic shaker incase you don't understand the written instructions and need to SEE it in action!) Get some
foam tape. Double up on the thickness for shaker cards by folding the tape on itself. This way your pieces can move about freely inside the shaker shape. Make a border around the outside of the circle on top of the plastic. (Don't let any of the foam tape show through the opening of the shaker, it will distract from your shaker pieces.) Also, make sure you don't have any holes between the tape pieces. If you do, your shaker pieces will escape though them. (Do not remove the top release paper yet.) Now fill up your shaker space with goodies! I used sequence, seed beads, tube beads, glitter stars and colored plastic beads. Fill it pretty full so when your card is upright, you can see your items. You can also glue a few goodies to the plastic to keep some items from falling to the bottom while the card is in its upright position. I glued a few stars at the top. I used the
Space Dies from Paper Smooches to cut stars out of glitter paper. I colored the back of my glitter paper yellow so if they were to flip over I didn't have a bunch of white paper stars showing. Add some doubled up foam tape to the bottom of your card too so when you add the galaxy cardstock, the top and bottom are the same thickness.
It's time to remove the adhesive and put the backing on. Make sure you have the galaxy you made showing through the circle shaker you made before you stick it all together. Once it is stuck down, it is hard to remove without ruining it.
Time to make the cute space man for the front of the card. I stamped the image of the space man and the words, "Get better in warp speed", from
Space Cadet, on Copic friendly cardstock. (I used Black Soot Distress Ink which is Copic friendly) I used various markers to color in my guy. Don't get too worked up in picking colors. Just pick a light and a dark for the grey and purple. I also used a tan for his face with some pink for the cheeks. Your choice of colored cardstock will determine what Copic markers you will need to color with. (I added a tiny Kleenex to his hand. I figured if he is there to help a sick friend, he can at least offer them a Kleenex!) I cut the words into a banner and added a tiny glitter star to tie into my shaker pieces.
Pop up the space man with triple foam tape and the words with double foam tape. At this point you are done! Have fun shaking your card!! I know your recipient will enjoy shaking it too!!
Thanks for joining me. I hope you enjoyed this tutorial. Please let me know if there is anything you would like to see a tutorial on. I would love to help you out if you have any questions!