Sunday, April 1, 2018

Joy Clair Best Buds Stamp Set and Challenge

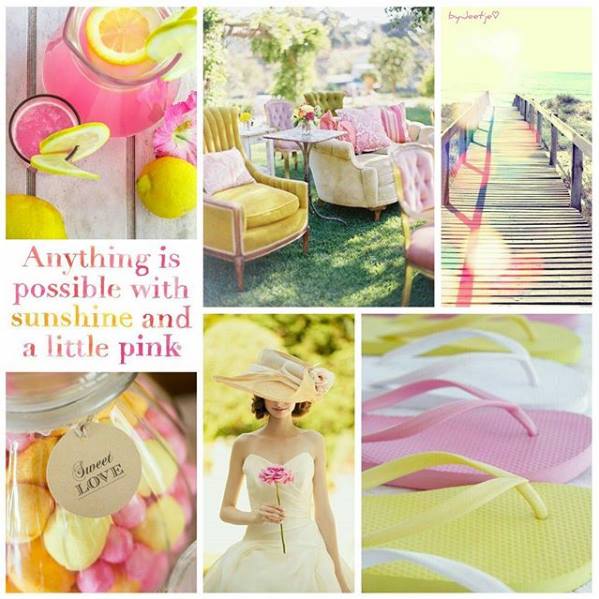
Joy Clair Stamps is having a challenge. Look at the photos below and make a card with what these images make you think of. I looked at them and it shouted, "RELAX"! I used a little blue and made a card using the "Get Well Wishes" stamp set.

http://joyclair.typepad.com/blog/2018/04/april-challenge-anything-goes.html

This is what I came up with.....


I stamped the cat and the tiny bird from "Get Well Wishes" with my MISTI and used some Stazon ink. I colored them with some colored pencils and cut them out with scissors.

I cut the neat pool out with my Silhouette Cameo 3 using a Miss Kate Cuttable's swimming pool design. After I cut out the pool items, I used a white marker to add in some water lines and layered it on a pieced of decorative green paper, to resemble grass. I popped up the tiny bird on his arm to give it some depth.


To finish it off, I cut the word, "relax" out with some alphabet dies and my Sizzix machine.

Thanks for stopping by!!


Thursday, March 22, 2018

Faux Chalkboard with Miss Kate Cuttables

I know it is February but I love Halloween projects and to me it is never too early to start making Halloween décor. 


I love the look of the chalkboard but I have to admit, I am no good at keeping my writing centered and straight. I decided to try a faux chalkboard and I think it came out awesome! Let me know what you think!


I used Miss Kate Cuttables Halloween Night Word Art. Instead of using my cutter in my Cameo, I inserted a Uni-bal signo white gel pen. So instead of cutting the file, the white gel pen wrote out the file. As you can see above, this is what it looks like. The white pen did not draw it without skips but I wasn't going for a solid look. I wanted it to look like a chalk board sketch so I was happy. I used an 8.5x11 piece of black cardstock. You can also use green for the faux chalkboard look. After I got my sketch I colored it in with chalk pencils. If you don't have the chalk pencils, just use chalk pieces. 


When I was finished, I framed it and I was done!
Very easy and I love the results!
Give faux chalkboard a try either with this design or a different one. Please post pics below and share them with all of us!
Until next time, Happy Crafting!!
Jen


Saturday, March 17, 2018

Bible Journaling with Joy Clair's Praise the Lord and Refuel My Soul

Another Bible journaling entry.  I did two different kinds of pages this time. One I did water coloring on and the other I did a clean and simple (CAS) with Atyou Spica twinkling pens. I love the glitter these pens leave behind with the bright colors. You can also see though them so I decided to use them to highlight some of my words. I don't like to stamp or draw over my Bible verses, I like to read the words though my mediums. So finding these were a great addition to my Bible journaling tools.

Refule upclose

Refule upclose

For the first page I used the Joy Clair stamp set called, "Praise the Lord". Like I stated above, I made this a CAS page. I kept it simple. I colored all the wording and highlighted my important words with the Spica pens. I love the glitter look. I am not sure it shows up in the pictures but in person it is so glittery with TINY specs of shimmer. I also used StazOn ink to stamp my words so if I decided to use water color it wouldn't run.

Refule upclose

For the second page I used "Refuel My Soul" by Joy Clair. I decided to do some water coloring. I primed my pages with clear Gesso so it wouldn't bleed though to the next page and let that dry. I always highlight the important passages with some kind of medium. I used my Bible highlighters. Next, I stamped all my images with StazOn and painted my images with Koi Water Colors. I also stamped the gas pump on the opposite page because I loved it and wanted to use it on my page somewhere but ran out of space on the page I was working on. I like to carry some of the images to both pages to keep the flow and tie the pages together.

Refule upclose


Refule upclose

I like to look at my Bible Journaling as my own mixed media mini projects. Each page I do something different and use a different medium. It all depends on what the reading is about and what my stamp set is. I hope you like my latest journal pages and learned something new to help you with your own Bible Journaling.

Until next time, Keep Crafting!!
Jen

(Share your Bible journaling with me in the comments section!)


Tuesday, March 13, 2018

Gnome is Where the Heart Is and Get Well Wishes from Joy Clair

Hi! I'm here to share with you my fun little card. This is a great card to send to someone to brighten their day! It can also be used for a birthday or a thank you card. I used two of the new stamps sets from Joy Clair one called, "Gnome is Where the Heart Is" and the other one is "Get Well Wishes". They are both great sets. Go on over to Joy Clair and check them out as well as all the new sets in this release!

Don't forget to check out the Joy Clair Challenge! You can win some nice prizes!

Gnome home

This card is pretty straight forward. I stamped all my images out on Copic friendly paper and use Memento ink which is also Copic friendly. I colored my images in with Copic markers. (Copic colors used: E30, E42, E55, E74, E77, N0, R37, R46, R000, R83, B24, B29, C3, C1, Y13, Y35, YR23, Y18 These are just what I had and use them as suggestions. Use the colors you like and have on hand.)

CU gnomes

I used a white gel pen to add some dots to the girl gnome's hat and fix any bleed overs I had with my markers. (This is a good Copic tip)

Gnome home

I cut out a piece of light blue cardstock 3.25 x 4.25 inch and used a stitched rounded rectangle die to cut. I ran the blue piece of cardstock as well as my card front (A2) though a Sizzix machine with a cloud embossing folder. I adhered them together with some glue. I then added my colored images, after I fussy cut them out, with foam adhesive.

Gnome home

Lastly, I stamped my sentiment from, "Get Well Wishes" with my MISTI on to thick vellum and cut it in a banner shape with my scissors and used foam adhesive to apply it under the mushroom house to give it some lift. (I also love glitter so I used some Wink of Stella on the sun to give it a little shimmer.)


Misti 3

Just a hint with clear stamps and MISTI. If your sentiment is not lined up the way you want it, you can cut it apart like I did. (see above) It does not hurt the stamp to cut it so you can manipulate to fit your space. If you don't want to cut your stamp, that is fine too. You can use the MISTI to line up your words before you stamp. I lined up my words on my vellum, closed the door to get the stamps to stick to the door.

Misti 3

Once your stamps are stuck to the clear door, open it up and ink your stamp. Next, close the door and your words are perfectly stamped exactly where you wanted them. (see above image, I closed the clear door with my inked stamped words on to my vellum banner.

Misti 3

Open the door and your image is EXACTLY where you wanted it. If by chance you didn't apply enough pressure and you get a "dead space" in your stamping. Just open the door, reink and close the door and it will line up PERFECTLY again. That is the beauty of the MISTI.


That's it! I hope you like this cute little card as much as I do!
Be sure to subscribe to my blog so you don't miss any projects and posts!
Until next time.....Keep Crafting!!

Monday, March 12, 2018

Miss Kate Cuttables Challenge

Today's post is a quick card I made for Miss Kate Cuttables Challenge for March. The challenge is "Anything Card". As always I made one of my favorite holiday cards, Halloween.

Before we get into the card, don't forget to hop on over to Miss Kate Cuttables for the Daily Freebie!!

Now for my card:


  • Download Haunted House from Miss Kate Cuttables 
  • Cut it out at 4 inches from black card stock.
  • Card base 4.25 x 5.5 white card or A2 size blank card.
  • Cut some black card stock for hill place on card front.
  • Lay the die cut on the card and trace lightly the windows and moon for placement, remove die cut.
  • Using some dye inks and a sponge dauber, rub some colors where your windows will be. 
  • Cut a circle out of some scrap paper the size of the moon and place the open hole over where you want the moon and use yellow dye ink to color the moon circle shape.
  • Cover the moon with the other part of the circle you cut out to keep the moon from getting ink all over when you do the black sky.
  • Add some colors in the sky with some dye ink and a dauber.
  • Using some black dye ink and a dauber, rub black ink over all sky area even over color spaces. 
  • When you have the sky looking the way you like, remove the moon cover and add a little black over it to mute the moon a little. 
  • Next erase all pencil lines from window areas.
  • Add adhesive to house die cut and glue in place. Make sure you position over moon and windows. 
  • Add some white gel pen dots for stars.
  •  For some additional glitz, add some glossy accents over the windows and some Wink of Stella over the sky.


Thanks for stopping by!!
Jen


Thursday, March 1, 2018

Joy Clair Stamps Challenge New Baby

Over at Joy Clair's Blog, they are running a challenge and here is my answer to their call!

https://l.facebook.com/l.php?u=http%3A%2F%2Fjoyclair.typepad.com%2Fblog%2F2018%2F03%2Fmarch-challenge-anything-goes.html&h=ATNHkfviXH_Db92h1Y36Yq3hLkQIwsLfL_IJJ-b-sdYyGdaN_7h0wGkyFZMeLfDdXTP6sBWAruPaEVDmqgYQOot4tpVMcglqOC9OpZFWniGgKCpZDghX0fjy9Wn5o-qWnA

Looking at the pictures above, what do you think of? I thought of babies! I had the "New Baby" stamp set and thought it would be fun to make "onesies" in these colors. Perfect for a new baby! Either boy or girl!!
 

I made this super easy using the MISTI from "My Sweet Petunia". I lined up my stamps on the MISTI and stamped them with VersaMark ink. I then put white embossing powder on them and heated them with my heat gun.

I cut out my images and got ready to add my sentiments on the front of the onesies. To make this an easy process, I again turned to my MISTI.


I placed the cut out onesies on the MISTI and then it was easy to line up the word stamps with the grid lines. When I got the stamps exactly where I wanted them, I closed the clear door to the MISTI.


The photo above shows the door closed. When I closed the door, the stamps stick to the clear door and I am now ready to stamp. I open the door and add my favorite ink, in this case, I added VersaMark.


After adding the ink close the door and press like you would with any stamp. The great thing about the MISTI is if you don't get the image you want, if you get gaps in your stamped images, you just open the door again and re-ink. Once you re-ink, just close the door and re-stamp and it will stamp EXACTLY where it stamped previously so no more double lines in your stamping!


After stamping with VersaMark, I used the white embossing powder again with the heat gun to set the powder and arranged it on my card front. I made a larger card then the normal A2. This card measures 5 x 7 inch. (You can easily make this card smaller, just do one layer card.) I ran my first layer though an embossing folder with mini dots. (4 x 5.5 inch) Then I used 2 layers of patterned paper adhered them together with glue and then used foam adhesive to pop up the final layer on white card stock card base. To finish off, I used a corner rounder on all papers and added some sequins and some jewels in the holes in the sequins.

http://blog.mysweetpetunia.com/

Please check out the Challenge over at Joy Clair's Blog and join along on the fun! Click on the image above and check out My Sweet Petunia's blog and all their great ideas too!!

Until next time!
Happy Crafting!


Thursday, February 22, 2018

Miss Kate Cuttables Vase of Roses

I know Valentine's day is over but this card can be used for more then just Valentine's day. Anytime you want to show someone you care with a special card, this is the one!

Before I start on how I made this card, don't forget to stop by Miss Kate Cuttables today and every day for your free svg file! 


I choose the Miss Kate Cuttables, "Roses in Vase" for my main image. I cut the image out after I sized the image to fit my A2 card. Use your favorite program to size it to any size you wish. You can make it larger for scrapbooking pages and smaller for note cards. Just cutting out one rose can be fun on a note card or love note. I used my favorite program Make the Cut and then saved my svg and imported it into Silhouette Cameo program to cut.

 
As I mentioned it is an A2 size card meaning it is 4.25 x 5.5 in finished size.  I took a piece of black cardstock 8.5 x 5.5 and scored at 4.25. This is my card base. I then took a piece of white cardstock and ran it though my Sizzix machine with an embossing folder with some hearts on it. This piece measures 4 x 5.25 in. I adhered it to my card front with tape runner. Next I cut out all my roses and my vase pieces. I used vellum to cut out the top layer of my vase to resemble my glass vase. The heart I used for the sentiment was just a shape I had in my cutting files. I cut that at 2.5 inch and the inner white heart at 2.25 inches.


After all the pieces were cut and assembled, I added some shimmer to my roses with a Wink of Stella pen. It is hard to see in the pictures but trust me, they shimmer!! I glued all the pieces together and added it on my card front with some foam adhesive to give it some dimension. I used a stamp set from Joy Clair Stamps to stamp my sentiment on my hearts. The set is called, "Gnome is where the heart is". 

 
On the inside I cut a white heart at 4 inches to stamp my sentiment. I used another Joy Clair stamp set called, "Love Languages". It also had the cute hearts I stamped in red inside and outside on the front of the card.


That's it! I hope you like this Love Card and hope you make one for someone special in your life!

Happy Crafting!!