Friday, October 27, 2017

Miss Kate Cuttables Guest Designer Card Number 2


 This fun and easy shaker card was made with the Miss Kate Cuttables cut file Halloween Witch Shoe Frame. I will take you step by step and show you how to make this basic shaker card.
You will need a die cutting machine such as a Silhouette or Cricut to make this card.

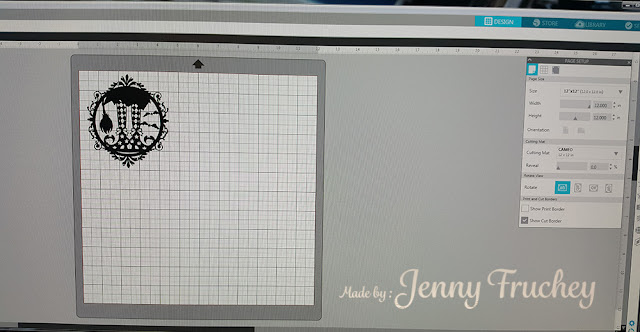
Open up the file in your favorite editing program. I am using the Cameo 3 by Silhouette.


 Size the image to 4inches wide. If you keep the ratio locked, the length will adjust automatically. (aprox. 4.5 inches wide) Cut it out on black paper. 


Next weed or clean up the design and take it off the mat. You just made a die cut! Now you can use the die cut as is and mount it on a card or make a fun shaker like I did.


Cut a card that is 4.33 x 5.5 inches. Score at 4.25 and .125 or 1/8 inch to the left of your regular score. This is to allow room for the shaker and so the card folds correctly. Add the decorative paper to the front of your card and die cut a circle in the center. Use a 3.5 inch circle die. 


Glue the die cut image over the circle on the front of your card.(I did this step later but you should do it now.) Keep the edges of the circle behind the black border of the die cut. (I accidentally glued it on backwards, it really doesn't matter which way you glue it, it is reversible.)


Using some recycled plastic, glue a piece large enough to cover the hole on the INSIDE of the card as pictured below. 


Using some foam tape, begin to add tape around the circle in the inside of the card front over the hole. Keep the foam on the card and not on the hole itself. I wanted my items to shake around freely so I doubled up on my foam. I also went around the inside of my foam with a powder tool to remove any tackiness so my shaker pieces would not stick to the adhesive. 


 Now the fun part! Fill your shaker with all kinds of goodies. I used sequins, plastic balls and beads. You can use tiny punches, pearls, sand or any other tiny items you want to "shake" around in your card front.


Remove the backing from the foam and add a piece of 4.25 x 5.5 piece of cardstock. I used purple. Use a color to match your patterned paper.The shaker card is finished. Now to decorate the front a bit. I used a die cut sentiment and cut it several times from the purple paper and layered them together to give me a thick die cut word. I glued it on the lower right hand side of the card and I was finished.....


So I thought.....


I decided to play a bit more and added the shaker to a 5.5 x 8.5 inch card. I added some black paper for the base, a purple embossed piece for the second layer and some die cuts from Miss Kate Cuttables (Spiderweb Set). I used the card for my shaker element and added a few little pieces from the shaker for some color. For fun I added a spider with google eyes!


Hope you enjoyed all the ideas and die cuts from Miss Kate Cuttables!
Happy Crafting!

Jen from Jen's Crafty Place

Miss Kate Cuttables Guest Design Team

Hi! This is Jenny Fruchey from Jen's Crafty Place as your Guest Designer today! I can't wait to share my Halloween card with all of you!


This adorable die cut is from Miss Kate Cuttables Witch in Cauldron. This is a larger card size then the normal A2 (4.25 x 5.5). I made this card 8.5 x 5.5 so I can make the design larger. You can cut the witch in cauldron any size you would like to match your card size. That is the great thing about cutting these designs with your own cutter.


Now let's make the card!

Gather your supplies:

Purple cardstock base 8.5 x 11 inch
Black cardstock : 8.25x 5.25 and 4.25 x 5.25 inch
Purple pattern paper: 8.125 x 5.125 inch
Orange pattern paper: 4 x 5 inch
Scrap white cardstock for Sentiment
Black in Memento for Sentiment
Miss Kate's Witch in Cauldron cut from cutting machine finished size: 5.25 inch
(Scrap paper: two shades of green, two shades of orange, 2 shades grey, black, 3 shades of purple)
Rubber stamp with Halloween saying: Toil & Trouble from tailored expressions used now retired
Layered dies to cut saying: Sizzix Labels Fancy #4 the
Crafter's Companion Clear Sparkle Pen
Faux Enamel Dots: Made by Me
Foam Squares


Make your Witch in Cauldron from your Miss Kate Cuttables file. Use scrap papers to cut each layer and assemble with clear glue. Make the die cut fit the card you have decided to make. If making the size I did, assemble her to 5.25 inch total size. Add some sparkle pen to the bubbles and all parts of the insides of the cauldron. I do like sparkle so I added some to the bows on her shoes too!

Next, fold your 8.5 x 11 inch piece of purple cardstock in half for the card base and set aside.  Stamp your sentiment on white cardstock and cut with your favorite shape die. I used Sizzix Labels Fancy #4. Cut out a shadow layer, I used black with the same die set.

Cut your black mats, purple pattern paper and orange pattern paper to the sizes above. Adhere with tape or glue on the purple card base. Add the die cut and the sentiment with foam squares, add faux enamel dots and you are done!

Happy Crafting and Happy Halloween!!
Be sure to drop by my blog and please subscribe for more fun ideas: http://jenscraftyplace.blogspot.com/

Thursday, August 31, 2017

Taylored Expressions 9th Birthday!

Today I am celebrating with Taylored Expressions on their 9th birthday with a Birthday Sketch Challenge.


I took the sketch from above and made a "thank you" card using their Hippo Birdy stamp set. The sketch is fun and can be used in a variety of ways. I plan on making a few other cards so check back often!


Happy Crafting!
Jen


This is another one I made for the challenge!
 

Monday, August 21, 2017

Beautiful Bloom by Crafter's Companion


Crafter's Companion has some beautiful stamps for water coloring. These stamps are from a set called, "Beautiful Bloom". As of August 21, 2017 it is only available for purchase through HSN. It is part of the new water color release. Check it out!

I water colored the two images with Aqua Markers by Crafter's Companion, mounted them on black paper then layered it on some glitter Luxury Cardstock also by Crafter's Companion.  I used a standup card base, also available on HSN.com, to mount my layers on. The sentiment is white heat embossed with the a stamp from the "Beautiful Bloom" set using the new heat gun from Crafter's Companion with one of the new embossing powders. I added a few faux adhesive pearls and I was finished!


As of today, August 21, 2017 these items are only available from HSN.com  (#hsn, #hsncrafts, #crafterscompanion) These items are all part of the new release from Crafter's Companion. They are all specially priced so be sure to check them out!

Tuesday, August 15, 2017

Crafter's Companion on HSN Starting at Midnight!

Just a reminder to tune in to HSN starting Wednesday, August 16, 2017 at midnight to see the Today's Special by Crafter's Companion. There is a great "Watch Party" going on now over on Facebook in the Events section of Crafter's Companion USA site. Come on by for discussions on products, meet the Design Team, prizes and lots of ideas and projects!


Happy Shopping!!!
Jen

Friday, August 4, 2017

Another Sneak Peek of Crafter's Companion on HSN


This is a 3D embossing folder available for purchase on HSN Wednesday, August 16, 2017 in a pack of other beautiful 3D embossing folders. They are more then just your ordinary embossing folders, these are 3D! There are many depths of the images. Some are very defined and some are just raised slightly. Looks closely and you can see the detail in this watercolor image.


If you don't want to watercolor it, it looks great just embossed on metallic paper and highlighted with some gilding wax.


Don't forget to check out the "Watch Party" over on Facebook during the 12 hour broadcast.

Happy Shopping and Happy Crafting!!
Jen

Thursday, July 27, 2017

Crafter's Companion and HSN

Crafter's Companion is on HSN Wednesday, August 16, 2017. Come join the WATCH PARTY on Facebook. There are prizes, sneak peeks and tons of inspiration on what you will be seeing on HSN!

Here is my contribution to the "sneak peek".......


How about a close up of the shaker??


Come on over to the Crafter's Companion Facebook page for more projects like this!!


Happy Crafting!!
Jen


Sunday, July 23, 2017

Food Fun with Crafter's Companion


This quick little card was colored with my  Spectrum ColourBlend colored pencils and Gamsol blended. These wonderful pencils are from Crafter's Companion. The images were stamped on Ultra Smooth Premium White Cardstock colored with the highly pigmented pencils and blended smooth with the Gamsol solution for the smooth blended look. I added some Glossy Accents over some of the images for a shinny, wet look. I arranged them in the circles that I cut with a stitched die and added a strip of craft cardstock over the holes to make the images show up better. Lastly, I stamped a sentiment, added some faux enamel dots (to balance out the sentiment) and I'm done!


Happy Crafting!
Jen

Sunday, July 16, 2017

Soccer Boy Birthday Card by Crafter's Companion


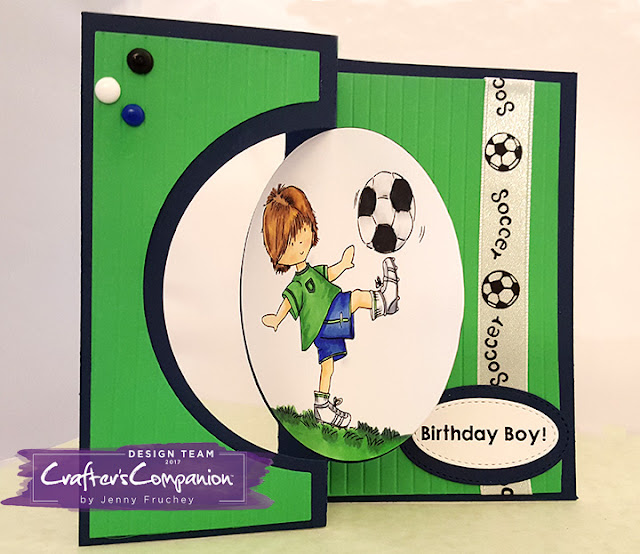
This adorable little soccer boy is from Crafter's Companion. He has since retired but there are many other wonderful images still available. I colored him with Spectrum Noir alcohol markers also from Crafter's Companion. The card base itself is a kinetic card called Circle Center from the Create-A-Card series from Die'sire. These are also from Crafter's Companion.

With this Circle Center card set, you cut out the navy card with the base swing circle. (Follow instructions on package) Next, stamp your image on appropriate paper  and color it with your desired medium. Using a circle die, cut the image out to fit the center circle. Attach image with adhesive to the circle on your navy card stock base.


With the second set of dies, included in the Create-A-Card kit, cut out the green card stock. Using a bone folder and either your paper trimmer or scoring pad, score the paper every 1/4 inch creating a little bit of dimension. (You may also use an embossing folder of your choice.) If you have any ribbon you would like to add, attach to the right panel of the green card stock before you apply to the navy card base. This way you can attach the ribbon to the back of the green card so it won't show when the card is flipped over. Next, attach the green card stock panels to the navy blue base with adhesive.


Stamp a sentiment on card stock and cut with either hand punches, oval dies or hand cut around the wording. Add a navy mat around the stamped shape. I used a stitched oval die and my Gemini to cut mine out. Attach with adhesive and the card is complete!! (I added a few faux enamel dots to the center to pull al the colors together and also balance out the left side with the right side.)

This Create-A-Card die is perfect for making quick and easy cards that have a lot of WOW power!

Happy Crafting!!
Jen

Monday, July 10, 2017

Paper Smooches and Crafter's Companion with Spectrum Noir Alcohol Markers


This adorable grad card is quick when you use Spectrum Noir Alcohol Markers to color the Paper Smooches, Smarty Pants image. Stamp the images with Memento Tuxedo Black ink on Spectrum Noir Ultra Smooth Premium White Cardstock. Color the images with markers. (EB5, EB3, JG3, JG6, True Black, GG4, JG2, CT4, CT1, GY5, TB1, IG3, FS3, FS5, TB2, TB5, OR1, OR2, DR1, DR5, and Blender) Cut around images leaving 1/16 inch of white around them. Set aside.

Cut out a frame border with either wood grain paper or stamp wood grain stamp onto brown paper and cut out. Add black cardstock inside the frame as the faux chalkboard. Stamp your sentiment with versa mark and add white embossing powder and heat. (I used an Embossing Buddy to keep the embossing powder from sticking to places other then my sentiments but kept the dust on the paper. It serves as old chalk dust to add more interest to the piece.) I also used a white Signo pen on the chalkboard and to the pointer in the professor's hand for the look of faux chalk. Tape to your card front.

Now add some foam squares to pop up the professor and the books then add it to your card. I added some shading under the professor and books to anchor them to the floor instead of having them floating in the card. You can be done at this time but to add a little more fun, use some Glossy Accents to the glasses to look more realistic.

Finished!
I am sure your favorite Grad will love it!
Happy Crafting!
Jen


Crafter's Companion Illustrator Alcohol Markers


This card is a fun one to create and really fast. Take any image. I used a retired image from Crafter's Companion. Stamp it on your favorite cardstock and color it with your favorite medium. I used Crafter's Companion's Illustrator Alcohol Markers for my design. I cut the circle with my favorite stitched circle die and mounted it off set on my card. I cut off the part sticking off the paper for a different look. I mounted 2 different colored pattern papers for my base. I used scrap papers from my paper stash. Added a bow and I was done! It is a clean and simple card with a lot of POP!

Happy Crafting!!

Jen

Check out Addicted to CAS for some more Clean and Simple card ideas! I have entered this in the CAS code word "SUMMER" challenge.

Monday, July 3, 2017

Crafter's Companion and Art Impressions


This adorable stamp image is from Art Impressions. It is called "My Feet Set".  I made this as a fun Halloween card for a child. It isn't spooky at all but it is fun and interactive!


The card base is made by Crafter's Companion called "Circle Center". It is a flip card with a generous circle center base to add an image, sentiment or just decorative paper. I added an interactive stamped image from Art Impressions. His feet are on a Wobbler. It is a special piece added to make the item stuck on it "wobble".


Monday, June 12, 2017

Crafter's Companion Classic Floral Frame Die

One Die, Three Looks


This floral frame die is from Crafter's Companion. It can be used many ways. You can just die cut and use as is, with little or no embellishments, like the one above. I just added a few rhinestones and a bow with a die cut saying and this card is ready to go!


This card is using the same die but I added some ink to the details to bring out the floral part of the die. I added some more rhinestones and a lighter bow with die cut and this card is done.


This last card is so glittery it doesn't need any rhinestones. (I added a few because I love bling!) I used glitter card stock which I popped up on pop dots over some floral paper. Added a sentiment and bow and this card is DONE! So fancy and ready that special event like anniversary, wedding or just a special card for a loved one.

This die can also be cut apart for the frame to be used separately. Take a look at your dies and see other uses for them other then their intended purposes. Be creative! That is how you get your cards to be originals!

Happy Card Making!


Monday, May 29, 2017

Karen Burniston's New Charm Accordion Die and Woodland Animal Die


This is a new card die from Karen Burniston, Charm Accordion. It is a 4.25x 3.25 size card that includes decorative panels and 5 mini charms. The apple is one of the charms. The other fun fruit on my card is from Karen's other die sets: Jinks the Monkey and Lucky the Rabbit. I added a bit of shading with my Crafter's Companion Colorista Colored Pencils.


This adorable little fellow is one of Karen Burniston's new Woodland Animal Die. It is one of three critters in the die set. It includes this cute raccoon, a squirrel and a fox.


When the card is opened, it is an accordion style card. You can add more panels if you would like. I went with the original 2 panel card. The apple charm floats in the middle frame that connects the two panels. I used a dollar store stamp for my sentiment. I love this little card. This will go into a care package of food I will be sending to a friend. (I am Italian so I am always cooking and sending food to friends and family!)

Sunday, May 28, 2017

Art Impressions and Crafter's Companion Spectrum Noir Alcohol Markers


This cute stamped image is from Art Impressions. It is colored with Crafter's Companion Spectrum Noir alcohol markers. I love all the colors they have and they are all refillable! Very affordable vs other alcohol markers.


I did very simple shading. It is easy with alcohol markers to get a smooth shade.


The bottom is decorated with Tim Holtz's Trick or Treat Shadow die. It has many Halloween elements on it, I only used a few. I also added some glitter pen from Spectrum Noir on the owl as well as google eyes on the owl and bats. I like that it adds a bit of whimsy to the card. It was a fun and easy card to put together. You don't have to have the same elements as I do, just use the card sketch and see what you can come up with!

Monday, May 1, 2017

Crafter's Companion Day of the Dead stamps


This quick and easy card is made from a new stamp set by Sheena Douglas. It's called Butterfly Rose from Crafter's Companion. I used Colorista colored pencils from Crafter's Companion to color my image. After I cut out the butterfly I curved the wings for some added dimension. For some added bling, I used some scrap gold thread-like material for under the butterfly. Just glue it on before you add the butterfly. I used some vellum for the lacy square that I die cut with a nestability die called lacy square. The back white cardstock panel is embossed with a new 3D embossing folder by We Are Memory Keepers. I mounted them all on a black piece of cardstock and then attached it all on a square 5x5 card base.

Happy Crafting!!

Sunday, April 16, 2017

Paper Piecing Fun

This cute little guy is a stamp from Penny Black named "Snowy". There are so many ways to decorate this guy, I am having fun doing some of them. This one is paper pieced. You can color with markers, watercolor with paints, or color with colored pencils. What ever the medium you like to work in, this little guy is fun to do!

I used Doodle Bug paper for the background, scarf and hat paper piecing as well as the gingham paper strip. I did some simple coloring on the body, face and hat with Spectrum Noir alcohol markers from Crafter's Companion. (The markers will be available on HSN Tuesday, May 9, 2017 with a whole bunch of other goodies from Crafter's Companion! Mark your calendars! It will be 24 hours of crafts and crafting items. Be sure to check out the "Today's Special" of wonderful card making dies from Crafter's Companion.)  I also used a Lawn Fawn stitched rectangle for the main image which I popped up on foam adhesive. I added the faux enamel dots, which I made, for my embellishment. For the sentiment I used a Lawn Fawn set called Winter Scripty Sayings.

I hope this gives you some inspiration (if not, you can check out this Pinterest page for more ideas) to get some card making of your own done. (It is never too early to start those Christmas cards!) Be sure to follow to my Pinterest page while you are there! Also subscribe to my blog on the right hand side of  this post to receive updates of my blog in your email!

Thank you and Happy Crafting!


Thursday, April 13, 2017

Bebunni and Spectrum Noir Markers

I made this sweet Bebunni birthday card with Crafter's Companion's stamp set called Yum, Yum, Yum. I colored him with Spectrum Noir alcohol markers. They are fun to color with and easy to get professional blends and textures.
Here is a close up of the bunny's fur texture. I colored the bunny with grey markers and then used the colorless blender to get the texture. I used a small piece of terry cloth towel, then added the colorless blender to the cloth and just tapped the image where I wanted the texture. I colored the bunny then did the texture technique before I colored any other part of the image. That way I didn't have to worry about accidentally getting blender on other parts of my design.

Check out Crafter's Companion on Facebook or Pinterest for more ideas and projects!

Monday, April 3, 2017

Crafter's Companion Bebunni


A quick hello and fun card for you today. I colored the bunny with Spectrum Noir alcohol markers. (Bunny: GG1, GG3 Envelope: AB1, AB3 Tag: MB1, Blender  Ears of bunny: AP1, AP2, PP2 Cheeks and Nose: PP2) To add texture to the bunny, I used some blender on a towel, blotted it on the colored bunny and let it dry.

I watercolored the background with Spectrum Noir Sparkle Pens. (Blue Topaz and Emerald Green)
The Bebunni stamp set is also from Crafter's Companion. The set is called, "Sent With Love".
I hope you try watercoloring with the Sparkle Pens. (The sparkle remains but is subtle.)  The result is amazing!